Last weekend I played in 16 people tournament in Wrocław (Poland). As I placed 2nd in previous one I had high hopes and to further increase my chances I spend a lot of time listbuilding and analyzing battleplans (you can find my preparation process in a lengthy article here: How to overprepare to a tournament ). I’m well aware that luck plays the big role in the game especially when taking into account potential battleplans (cursed relic for example, where winning initiative gives huge advantage), but I wanted to be well prepared. The list I played was a bit different to what I planned due to mixing deployment groups in warband submission form (my intention was to have Hammer and Shield reversed), but during the games I don’t think it had the biggest impact. I ended up with the list below:
Dagger:
Wight King on Skeletal Steed (leader)
3x Grave Guard
Shield:
(NH ally) Dreadwarden
3x Grave Guard
Hammer:
Dire Wolf
2x Grave Guard
Game 1 (SBGL with Dragon)
Take and hold. At 4th round if only your leader is within 5” from the center of the board you win, otherwise who has more fighters within 5” from the center wins

My opponent list:
Dagger:
Wight King (leader)
3x Skeleton with blade
Shield:
Necromancer
4x Skeleton with spear
Hammer:
Zombie Dragon
I witnessed interesting discussion during terrain setup of the table this game was played on. As 5 out of 16 players came with monsters this table was “designed” to be difficult for monster players and had terrain setup in a way that walls and fences were separating shorter edges of the board from the center of battlefield to limit monster movement. Sadly the area between the “wall of terrain” and the edge of the board was too narrow and allowed for only one place where Zombie Dragon could be set up and sadly it was just next to my Dagger deployment where I had my leader who was crucial to this game Victory Condition. I was lucky Dagger is deployed first so I put a Grave Guard in the middle of only possible place for Zombie Dragon which sadly resulted in the Dragon having to be deployed on the other side of the wall (I was expecting that the Dragon could be set up on top of terrain in this case but judge said that dragon can’t sit on top of this walls). So the table that was supposed to be difficult to monsters made in start almost in the middle of the board despite deployment location being the board edge.
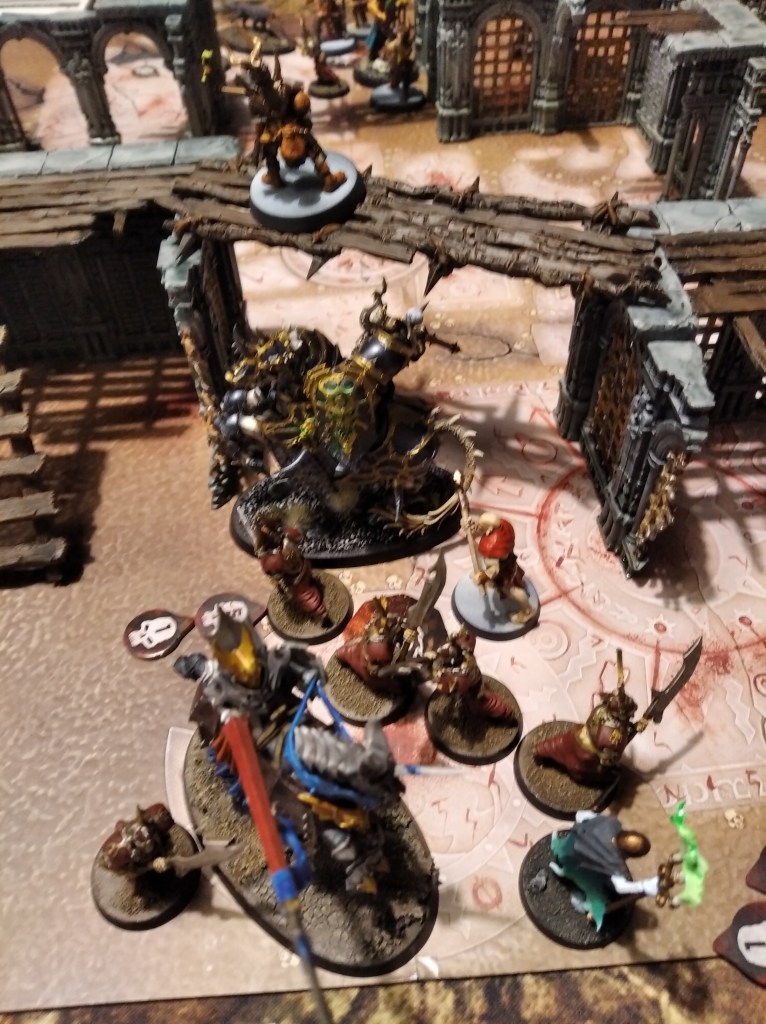
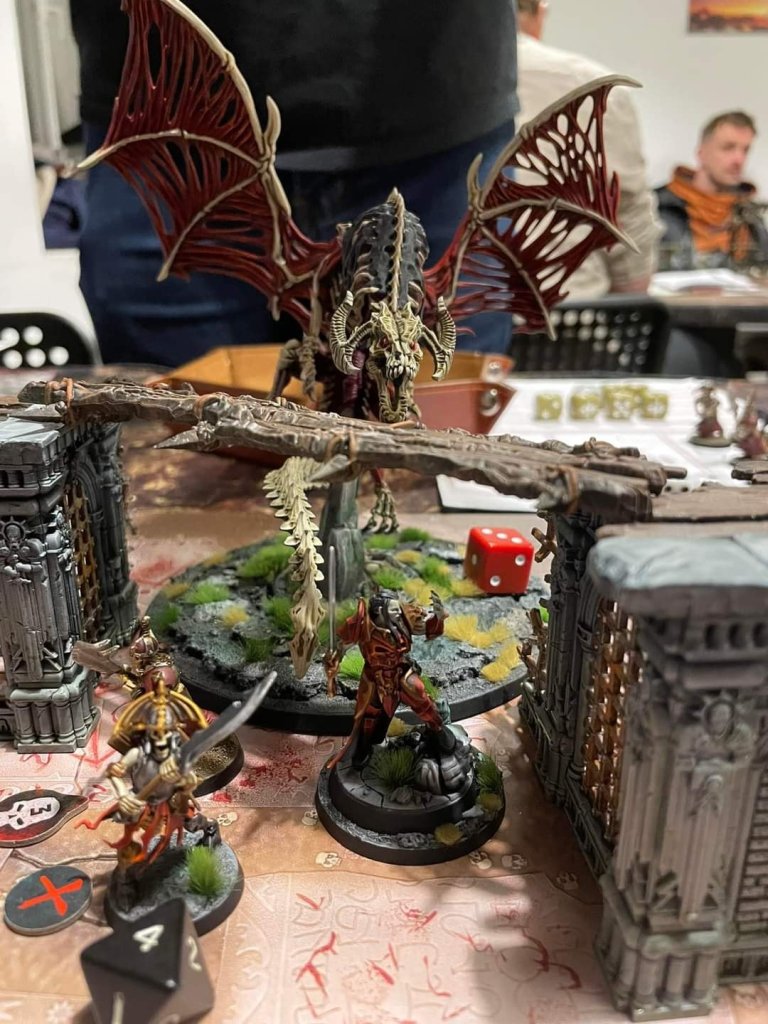
Round 1: We rolled for initiative and we both ended up with a double and triple. I lost roll off and my opponent improved his double to triple. I spent my wild dice to win initiative as my leader was in range for drag and maul (it wasn’t possible to be deployed otherwise with the unusual deployment map we had). I spend my first activation on 2 move actions and run as far away from the dragon as possible with my Wight King on Skeletal Steed. The terrain was dense and we had all deployment groups already in play so I managed to find a spot where it wasn’t possible for Zombie dragon to get into drag and maul range with single move (I strategically placed some Grave Guards to make this happen when I was deploying my Dagger, so I was happy with my decisions so far). Sadly my opponent was aware that even if he would kill my leader I had a Dreadwarden that could resurrect him. Fortunately for him the “wall situation” gave him opportunity to setup Zombie Dragon in Drag and Maul range to DreadWarden too. His first activation was to Drag and Maul the ghost. He didn’t have the highest triple value so was expecting to use ability and then attack my poor Nighthaunt ally, but sadly he rolled 4+ on all four dice so after my fighter was killed by ability he moved the dragon further to the center of the board. The picture below shows the battlefield after Zombie Dragon made his move.

During the deployment before the first turn we measured if standing on top of any platform will be enough to end up within 5’’ of the center of the board and the only place that met this criteria was the platform corner where you can see the enemy Necromancer. The picture above is perfect to introduce which fighters belong to which player, basically everything blue on bottom of the screen is my opponents Hammer and Shield (Zombie Dragon, 4 skeletons with spear and Necromancer). The group of green skeletons is my opponents Dagger with 3 skeletons with blades and a Wight King leader. Between green skeletons and the Dragon is my Shield. Freshly killed Dreadwarden was there with the 3 Grave Guards. My Dagger is scattered close to bottom left edge of the picture (3 Grave Guards are less than 4’’ away from the Dragon) and my fleeing leader is somewhere right to the picture hiding outside of threat range of anyone outside of Necromancer. My situation isn’t optimal as I still have a triple but will not resurrect this turn as both of my heroes are already activated or dead. But I have a good battleplan: kill the enemy Wight King that is already a bit surrounded by my Grave Guards and keep the dragon occupied and bracketed so my Wight King can stay safe. Sadly I can no longer resurrect Grave Guards on top of the Dragon as my only surviving resurrecter can’t go near the dragon. My next moves are simple: Grave Guards next to a Dragon go in and attack. My opponent instead of activating the Dragon focused on keeping his Leader safe and moved his Wight King to a safer location hiding him behind small wall as you will see in next picture. His next moves were moving his skeleton to engage my Grave Guards so they can’t change his precious leader into bone salad. I managed to roll extremely well bracketing the dragon before its second activation. Luckily it didn’t manage to kill my Grave Guard in attack action (due to -1 damage on attacks reaction. He targeted unactivated GG because I already had no ability to ressurect). I wasn’t the only one rolling high, enemy Necromancer attacked my leader twice doing 9 damage to him (he was hitting on 5+). Grave Guards from my Hammer managed to get within 6’’ of my mounted Wight King so they both used Shambling Horde to get on top of enemy leader. Dire Wolf followed them.

Last activation of the dragon was killing one of my Grave Guards and Dragging and Mauling another on top of his group of spearman that luckily did almost no damage to my fighter (he died in the end but at the cost of a lot of skeleton attacks, also before dying he hurt the dragon even more). We end first round with Zombie Dragon half dead and surrounded (22 damage on him), enemy Wight King also surrounded and damaged and my leader outside of any threat other than Necromancer. I feel great.
Round 2: I don’t remember Initiative results other than the fact we both have triple. Game defining moment happened during one of my opponents first activations. The Necromancer decided to shoot at my leader once again, on first attack the dice roll was 5 and 6 (9 damage) and the second roll was also 5 and 6 (My opponent said “I’m sorry” after 2nd roll). One activation of a fighter I don’t even consider good changed everything. My leader was left on 1 HP. My plan changed drastically: I decided to switch from “I need to kill the dragon and keep my leader alive” to “leave the dragon and kill all the skellies to outnumber my opponent at the end. Unfortunately it was my opponent turn to roll high on damage. I spend all my efforts trying to kill opposing leader. I moved my 1HP leader 2’’ from enemy leader and resurrect inactivated Grave Guard on top of him and attack.


When I try to kill Wight King with everything I have around (some of my fighters were wounded by skeletons round 1 and I needed to use their damage before they die as this is possibly my last turn of resurrecting) Zombie Dragon clears My Grave Guards. At some point both of our leaders stay on 1 HP but I manage to kill him that round.
Round 3:
This is how the board looks at the start of round 3:

I spend my wild dice trying to win initiative to resurrect and escape in my first move (naive plan but it’s the best I can think of in such dire situation) sadly I lose the roll off and my leader dies in my opponent first activation (Necromancer sniped him). At this point I have a total of 20HP of Grave Guards on the board, my opponent can still resurrect next turn, has over 20 HP of Zombie Dragon and 4 skeletons, we do one more activation each (one of my wounded Grave Guards die and I don’t manage to kill his skeleton in 2 attack actions) and I surrender. I had no chance to get to minor loss or to get my hidden agenda so I decided to check how everyone else is doing instead. I also needed some time to mental reset after the Necromancer snipe.
The Hidden Agenda I took was to have a fighter on every quarter of the battlefield at the end, I was quite sure it was a good choice as I wasn’t afraid of normal skeleton damage output and was expecting to outnumber my enemy either way. The tournament started bad, but as we play 4 rounds, there is still plenty of games to end up with a good position.
Game result: Major Loss (0 pts)
Game 2 (Skaven)
The Cursed Relic (2.0 Core Book). 1 Treasure that deals D6 damage to its holder at the end of its activation

My opponent list:
Dagger:
Rat ogor with warpfire gun
Packmaster
Plague censer bearerShield:
Plague censer bearer
Doom flayerHammer:
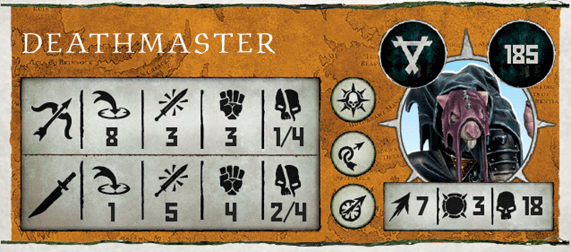
Deathmaster (leader)
Plague monk with woe-stave
I don’t like Cursed Relic as I always lose the initiative and need to chase the treasure. I deployed in classic way, everything as close to the center as possible with the corridor between my forces left so my treasure grabber can “park” in the middle of my forces. I also left some GG to intercept enemy Shield if deployed close to my forces (I was hoping it will force my opponent to deploy closer to the edge), which I think was a small mistake.
Round 1: I spend my wild dice trying to get the initiative and lose the roll off (as is tradition in this mission), but fortunately I have a double of fives and a double of sixes so Shambling Horde is going to be big round 1. My opponent grabs the treasure with Plague Monk and goes back finishing move in front of most of his forces but outside the range of move-attack of my leader (treasure hurts him for 3 or 4 damage). At this point my plan is simple: outwait the opponent as I have way more activations and in my last activations move Wight King on Skeletal Steed and use Shambling Horde on 2 Grave Guards that are the closest (one will get within 1’’ of the treasure bearer). In the meantime enemy Ratogor shoot my leader twice dealing significant damage. I moved my dire wolf too fast forgetting that with triple (that my opponent had access to) his leader has the ability to move 14’’ and attack, and this is exactly what happened, but this time dice gods were at my side and all the attacks missed.
After my opponent moved his fighters slightly towards the treasure I executed my plan and landed on top of the treasure with 2 Grave Guards and Wight King.
Round 2: Initiative starts with me spending wild dice to win the initiative. I do it because I already had access to a triple and high value double and wanted to capitalize on the fact that Grave Guard next to a treasure bearer was not engaged by anyone else so if I would manage to kill the treasure guy I can use Inspiring Presence to activate my Grave Guard and escape with treasure leaving my leader as a big and tough (T5) obstacle. I deployed my Shield as close to Ratogor as possible with the exception of Dreadwarden that started on a platform on a tree. My Shield just next to Ratogor was a sacrifice to buy enough time for my slow fighters to gather around the treasure. In future turns Dreadwarden was supposed to resurrect my fighters on top of Ratogor to keep him busy and my treasure safe. On first activation I do exactly what I planned and both of attack actions of my Wight King are not enough to kill a wounded Plague Monk. I use “Inspiring presence” as planned and luckily I’m able to kill the rat holding the treasure with first attack of my Grave Guard, as second action I grab the treasure and start running away towards the first obstacle I can hide behind knowing that Ratogor will snipe me without any issues. With the usage of Shambling Horde I manage to hide behind small ruins so Ratogor can’t see my guy.

The plan of my opponent was very simple – disable the resurrection engine, so his first activation was to shoot my Dreadwarden with Ratogor. 2nd game in a raw my ghost dies in my opponent first activation after it entered the battlefield (I even did the “take cover” reaction but failed to change crits to normal hits).

As planned I start throwing bodies at Ratogor but the attacks target Plague Censer Bearer next to it (I manage to kill it with 2 crits). I think the damage of my Grave Guards scarred my opponent a bit and he decided he wants to have his Deathmaster in better position, so he decided to use his triple to disengage. I surprised him using “Strike them down” reaction of my Direwolf that managed to do 3 damage. The assassin moved to position where he can jump on my reinforcement next turn and spent his last action shooting at my Grave Guard (it wasn’t very effective and frankly I think this whole activation was a big mistake on his part)

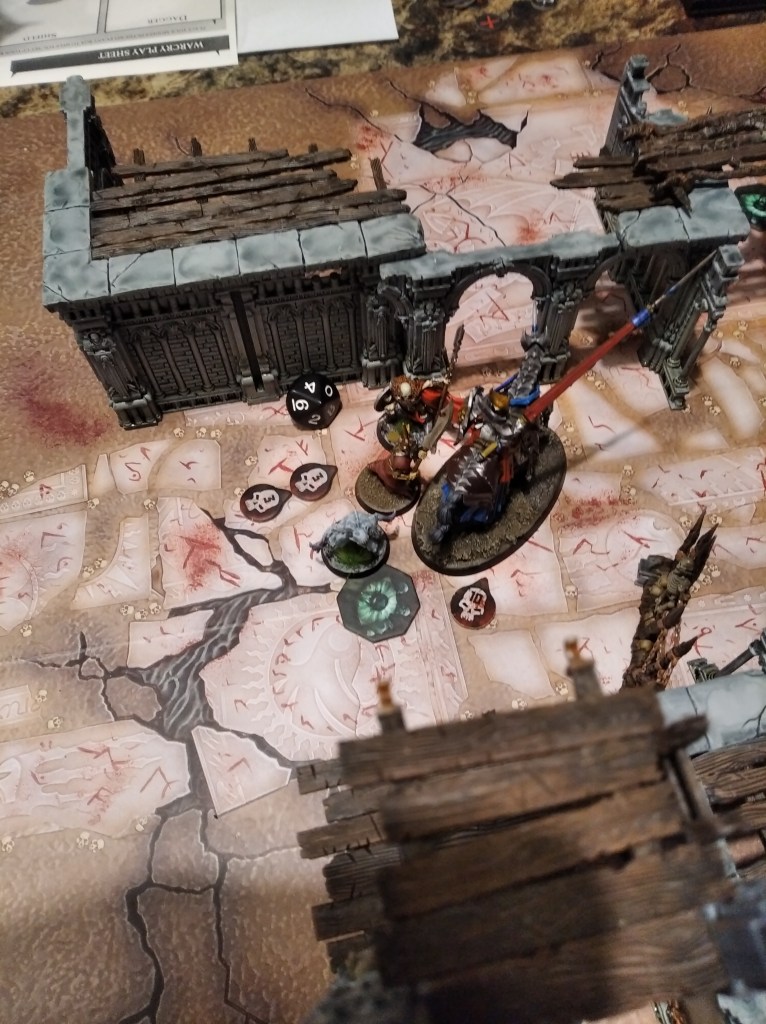
I moved one of my Grave Guards into engage with his Shield fighters to slow them down. My opponent moves his Packmaster 1’’ from my leader (I think he was trying to run away from inactivated Grave Guards), attacks for 3 damage and with “Crack the Whip” double gives bonus attack to Ratogor that kills my Grave Guard next to it. Next Grave Guard moves into the same position as his late friend and manage to do 2 damage to Ratogor. The picture below shows the state of the board in this moment. The small ruins behind my leaders head is where the Grave Guard with treasure hides. Not visible in this picture left to the action are my reinforcements slowly marching to the treasure.

In the beginning of 3rd round I managed to kill Plague Censor Bearer from enemy Shield that was intercepted earlier and resurrect Grave Guard on top of Packmaster. My leader died early this round and the rest of the game from this point was remaining Skaven trying to cut their way through Grave Guards to the treasure. We both lost a lot of fighters that game and in the end I had 4 fighters standing and my opponent had 2. After counting “kill score” we both killed almost exactly 75% of enemy forces. This is how my forces looked at the end of the game (The treasure only did 7 damage during 3 turns I had it)

The Hidden Agenda I chose was to kill enemy leader and keep my alive. I was quite sure that I will manage to do it but as my opponent decided to play the “kill every hero on sight” game instead of focusing on Victory Conditions I had no chance to do it. Deathmaster was the most squishy leader on the tournament so I think this decision was easy.
Game result: Minor Win (15 points)
Game 3 (Horns of Hashut)
Shifting Tides. North and South Objectives are worth 3 points and the rest is worth 1 point in rounds 1 and 3. In rounds 2 and 4 its the opposite.

My opponent list:
Dagger:
Ruinator Alpha with Heavy Flail (leader)
ShattererShield:
Slaughterpriest with Wrath-hammer (ally)
Demolisher with FlamehurlerHammer:
Varanguard with blade (ally)
Demolisher with Flamehurler
Shatterer
I was afraid of this board as a lot of dense terrain meant my slow fighters may have problems to get where I need them, but fortunatelly the opponent list was exactly what my list was prepared to deal with (7-8 models with 3-4 heavy damage dealers and some chaff around). I was very afraid of Flamehurler ability, that’s why all the fighters I deployed were never within 2” of my other fighters (some of them were on platform and some were on the floor level), I also made sure that my fighters that were deployed on top right part of the picture were difficult to reach with Slaughtepriest pull ability. The only doors in the long wall sections were on the bottom of the map near the objective.
Round 1: I have triple fives and a double and my opponent has triple of threes and a double of ones that he increased to triple. I wait with my guys as I heavily outnumber my opponent and can force him to commit to some objectives first and then react. My Dreadwarden is sitting on a platform as far as possible from all enemies but still having 2 important objectives in range of double move action. My opponent start the game exactly like my both previous opponents, he activates his Flamehurler, moves towords my ghost (he moved across the platform and not jumped down to the objective as I was expecting) and attacks Dreadwarden (1 damage) also using “Engulfing Flames of Dark Artifice (6 damage) on him.

First time this tournament it looks like I will have a chance to play with my Nighthaunt ally, as the only fighter that could reach it (I made sure to be outside of the range of Slaughterpriest pull) was already activated, but I decided to not move my ghost yet and wait until one of my guys die and then ressurect it. The other Flamehurler on the right side of the map also moved and shoot doing as little as 2 or 3 damage to my Grave Guard and not left platform so it ended his movement outside of objective control range too. I moved one of my guys to the top objective making sure that enemy Varanguard can’t follow the “highway” in the middle of the board up to reach me in one move action. He activated his chaff going to the left objective and I couldn’t wait any longer otherwise I would not be able to reach the objectives so I moved one of my Grave Guards to my left objective (outside threat range of Varanguard). his Slaughetpriest went to the right objective and my other Grave Guard went to the left objective. It wasn’t possible to place him outside of Varanguard move-attack range, but I could not do any more waits and still reach objectives (mostly due to spreading my forces during deployment to mitigate Engulfing Flaames of Dark Artifice) and I had my Dagger coming here next turn so potentially luring Varanguard here would let me control the map easier next rounds. There was a risk of losing both of my Graave Guards from this objective due to Varanguard’s Champion of Darkness, but I took the risk.

My opponent did exactly that and went in with Vaaranguard keeping his triple for Champion of Darkness but end up not using it as my Grave Guard suffered only 6 damage and survived. It was the end of his activations and with my remaining moves I took control of left objective with Dreadwarden (making sure that freshly appearing reinforcements (Dagger) can deploy in a “wall formation” around him so he is safe from Varanguard and enemy Shatterer. As my opponent did all of his activaations and none of my guys died I spend that triple to “Respite” my ghost healing him from 5 to 10 HP.

With remaining activations I swarmed the right objective outnumbering the Slaughterpriest there. First round end with top, left and right objectives in my control and noone around bottom objective. Scoring after firsst round is 7:0 in my favor. The picture below shows how the situation around left objective looks after we deployed our Daggers with the crowd around right objective in the distance.
Round 2: Dice Gods are still on my side as this turn I manage to have a triple, high double and my opponent has a triple of fours and a double ones that he improved to triple, but I still sweat when Flamehurler starts this round with his triple targeting my leader with 6 of my other fighters receiving secondary damage. It ended up doing around 15-18 damage in total which is a great value for a single triple but in the end it didn’t change the situation at all (none of my guys died and my heroes still had plantly of HP left), after ability he moved twice towards bottom objective but stayed on the edge of platform. In mu turn I kill the Shatterer on the left objective with the Grave Guard closest to him and move to engage Varanguard. The enemy Slaughterpriest decides to escape the “party on right objective” through the door visible in top right part of the picture and reaching the bottom objective. My next move is using double for Shambling Horde and 2 moves to run the rightmost Grave Guard from the picture through the door located near the middle of right edge of the picture to the bottom objective (I manage to cover enough distance that Varanguard can’t reach me there). My opponent answer by killing my 2 wounded Grave Guards (damn Flamehurler) with his Varanguard and using triple to follow my Grave Guard that just moved through the door reaching the bottom objective and blocking the path for my leader. Impressive move by Varanguard – it killed my 2 fighters and moved from secondary to primary objective and blocked the path to it with its huge base. The middle of round two is simply brawling around right objective where my opponent managed to get advantage and killed enough of my guys with the help of freshly arrived reinforcements from his dagger. Most of my Grave Guards from the left objective started to slowly move towards the center of the battlefield so they can reach other objectives next turns and to block the paths to other objectives for the only mobile fighter my opponent had – his Varanguard. I still heavily outactivated my opponent so when he was done with all his moves I managed to move around the wall to the bottom objective with my Wight King (my opponent thoght it was too far, but hopefully it wasn’t). My last move was moving Dreadwarden to the bottom objective gaining control over it, I was planning to resurrect Grave Guard on a platform next to enemy Flamehurler, but when I noticed that I can’t move far enough to hide Dreadwarden behind the Grave Guard that was already there I changed my plan and ressurected my fighter next to Varanguard as this “roadblock” would protect my heroes a bit. Next picture shows the situation around the bottom objective after round 2.

Round 2 end up with my opponent controlling right objective (that is secondary this turn) and me controlling all other objectives, so the score at the end of the turn is 14:1 in my favor.
Round 3 starts with my opponent trying to kill as many of my guys as possible with his Varanguard, but when the dice showed him First 2,2,2 and next 2,2,1 (both attacks were reacted with “Counter”) he surrendered.
My Hidden Agenda was to kill over half of my enemy models while keeping over half of my alive. I managed to do it even without my opponent surrendering
Game result: Major Win + Hidden agenda done (21 points)
Game 4 (SBGL with Dragon)
Strike the Heart. Home objective is worth 1 point, side objectives are worth 3 points and enemy objective gives 5 points

My opponent list:
Dagger:
Vampire Lord (leader)
Grave Guard with great wight blade
Skeleton Warrior with ancient spear
Grave Guard with wight blade and crypt shieldShield:
Crypt Ghast (ally)
Skeleton Warrior with ancient spear
Grave Guard with great wight bladeHammer:
Zombie Dragon
I played on the same table as previously, the only difference in objective position was that our home objectives moved 2” towards the center of the board.

After determining deployment colors “my side” of the battlefield was on the left and my opponent “side” was on the right. It was going to be interesting game centered about conquering opposing player’s home objective with the Zombie Dragon dropping on top on my “base” round two. We deploy most of our slow fighters on top of platforms between objectives I make sure that all of my Shield looks like it is going to the bottom objective, but as Vampire Lord starts there and it’s a secondary objective it’s the least attractive objective for me, my Wight King on Skeletal Steed is as close to top objective as possible. Enemy Skeleton and Grave Guard were deployed below the platform near the top objective. My opponent’s only ressurector – Vampire Lord is quite slow and my plan is to lure him somewhere and focus on all other objectives thanks to activation and mobility advantage while controlling the Dragon somehow.
Round 1: Initiative blessed me with a double of sixes and a triple and I start by increasing the triple to quad. My opponent had access to triple and made me start. First move is main and I try to start with a bang. I use Rampage and charge with my leader to the fighters standing next to top objective. I manage to kill Grave Guard and hurt Skeleton Warrior for 4 damage (I received a lot damage from “counter” reactions). My opponent decided to punish my Wight King for overextending this quickly and attacked my Wight King with his Skeleton Warrior increasing the damage on him to 10 with crits. I move in with one of my Grave Guards (sadly it was too far for him to attack) and my opponent adds Crypt Ghast to this brawl dealing 6 damage to my Grave Guard. This is how it looked in the end (sadly I couldn’t spare another Grave Guard there but I had to move one back to the top part of my home objective to limit the landing zone of the Dragon and the last Grave Guard from my Dagger will be mentioned later).
Now it was time for staring contest on the bottom part of the map. One by one we are both using wait actions and just before he waited with everyone other than his Vampire Lord (that has enough movement to reach both home objectives and can still resurrect) I moved one of my Grave Guards into bottom objective just in range for move and attack of Vampire Lord. My waiting guys were in range to go back to home objective if he would go there, but luckily he didn’t. I think we were playing different games at this point. My opponent placed his guys so after waiting most of them couldn’t reach his home objective, so he was waiting mainly to not enter threat range of my guys on the bottom objective and I had the option to reach both objectives (especially as I had one double still available) even after waiting. So the moment he committed Vampire Lord to bottom objective by coming and attacking my Grave Guard for few damage (he obviously resurrected there too) I knew the first round is main. I started to go back to my home objective with my waiting fighters and placed one so the Dragon can’t be deployed on top of the objective. At this time my opponent moved all but one fighters into the bottom objective. and the closest guy to his home objective went back and hide behind the terrain so it’s not possible to get my Wight King there next turn. What my opponent missed was that due to big activation advantage I still had 1 Grave Guard near the top objective and my Dreadwarden inactivated. With Shambling Horde (with Dice Value of six) and 2 moves I managed to get my Grave Guard to his home objective and moved my Dreadwarden there too (I was considering whether to put Dreadwarden within 1’’ of enemy Skeleton Warrior but in the end I did, I had to maximize the numbers advantage as soon as possible due to Zombie Dragon arriving next turn).

The first round ends with both home objectives under my control, tie around the top objective and bottom objective in the hands of my opponent, so the score is 6:3.
Round 2: Initiative started with triple of Sixes on my dice and a triple of fours and a high double on my opponent side. I immediately think of Monster Hunting Abilities, especially “Taunt”. This might be a solution for a Dragon problem, so I upgrade the triple to quad. This is the moment when the mental strain for playing for many hours, or just my inexperience struck. I measure that my Dreadwarden is exactly 12 inches away from the dragon so I declare my plan: I move my ghost and taunt the dragon, then I realise that hidden behind the terrain (that is not a wall, there are holes in it) is enemy Skeleton Warriorr that I decided to engage last turn. Instead of taunting the Dragon with one of the Grave Guards and running away (Dragon is engaged and I can keep him engaged) I decide to kill the Skeleton Warrior after I already told my opponent my plan of taunting the dragon. To make thing even worse I fail to kill the Warrior with my Grave Guard which is answered by the Dragon killing the only Grave Guard within 1’’ of it. Now my hopes of containing the Dragon are gone as I wouldn’t be able to prevent drag and mauling the taunting fighter as the Dragon is free to move. To make the situation even worse is that there are no solid walls north to my home objectives that I can hide the “taunter” from the dragon’s eyes. I decide to still go with the taunt plan and taunt the dragon with the most distant fighter and run to the top edge of the board to at least force the dragon to leave my home objective if he would decide to chase. Instead the Dragon Drag and Mauls to death my other Grave Guard that was blocking the Dragon from landing on my home objective (taunt does not prevent abilities, only attack actions) and moves on top of it. I now know what Thorin from Hobbit felt. I still have some Grave Guard on my home objective alive that my opponent tries to remove by first going in with his Grave Guard (boosted by Shambling Horde) and later Vampire Lord. Hopefully thanks to Soulblight Gravelords reaction I manage to survive with 2HP left. This is the picture of that poor guy:
Later on this round I try to kill enemy last 2 fighters on top objective and end up killing none (Soulblight Gravelords reaction is great in such situations) but manage to clear the only enemy fighter on his home objective, my opponent splits his forces between bottom objective and my home one. Thanks to mobility of Dire Wolf I manage to gain control over top objective. The round ends up with both of us controlling opposing player home objective and one of side objectives, so the score after round 2 is 14:11 in my favor.
Round 3: early round 3 our time went out (we were both playing quite slow) and the judge decided that it will be a tie, which was fine for us both as I had point advantage but the Dragon and Vampire Lord being full health gave “board advantage” to my opponent. The only important thing in 3rd round was one of my Grave Guards getting on top of a platform on his way from right objective to the bottom one which resulted in me fulfilling my Hidden Agenda for this game (be the only player with fighters 3’’ or above the battlefield floor) and adding one point.
Game result: Tie + Hidden Agenda done (11 points)
Overall the tournament was great, I managed to finish 7th out of 16 players with 47 points. There were 4 monsters in top 6, including both Zombie Dragons I met. I won some Killpoints tiebreakers with other players (I had over 2200 kill points). I have a tone of opinions about the games, the lists and our local meta, but as this is already way longer than I planned it to be let’s finish here.

Thanks for reading and have a great day!
