What are battleplans and battlepacks ?
Battleplan is the mission description that include Victory condition for that game, additional rules specific to this battleplan (like for example Loot and Pillage from Rumble Pack disables the option to spend action to drop objective) and often deployment map. All of this elements are important and will influence which approach to the game has the highest chance of success.

Set of battleplans is called a battlepack. Two most commonly used battlepacks are “Core Book” battlepack that contains 6 matched-play missions from the book (free PDF with core rules include only two of them) and Rumble Pack that you can access from the Battlepacks tab above. Both were released by Games Workshop and both have 6 missions but there are also other battlepacks like for example 12 mission Tidal Pack (also available above) prepared by Warcry most popular content creator – theSaltySea or the custom battlepacks prepared for single tournament like for example Norcry in Norway or Gnarlwood Into the Unknown in Poland (I managed to win this tournament, my short summary of this event is available here).
When analyzing battlepack it is important the answer questions listed below:
- What is the winning condition
- When is the winning condition checked
- What is the number and location of key areas of the map
- What are the distances between this areas and deployment points
- When each deployment group is deployed
Based on the answers for this questions you should know what your general plan is, what to expect from your enemy and you can start thinking on how to stop it.
1. What is the winning condition?
There are four types of battleplans that differ based on winning condition. In 3 that are most often used to win you have to:
- Control Objectives
- Pick up treasures
- Kill specific enemy models
I would call the forth category “other”, as it is sometimes an original concept like for example get all of your fighters from one battlefield edge to the other one or damage the Gorewyrm as much as possible and whoever deal more damage is the winner. The “other” missions are the least popular in competitive environments and due to their uniqueness can’t be analyzed as a “category” so I won’t focus on them. Let’s start with my favorite kind of mission:
1.1 Objective mission
Objective missions are one of the primary reasons why the number of fighters in your warband is important as usually the number of fighters around objectives is a deciding factor in scoring Victory Points. Before we move any further it is important to know that one faction likes to cheat a little here. When playing against Ironjawz (with Brutes in list) You messin’ must always be included in your plans:

With objective missions you can prepare a plan for round 1 as important areas of the map are static. One small detail worth remembering is that even if objective doesn’t grant Victory Points (as for example dormant objectives in Core Book’s Laylines) you can still gain control over it.

This is important as you don’t lose control over objectives until your opponent steals it so “planting your flag” (as my wife calls it) early is a smart play as in future rounds you will only have to match your opponent numbers on such objective to keep control over it. As I don’t want to only speak about theory here, lets discuss real life tactical dilemma. Let’s consider the following situation: we are playing Tides of Battle from Rumble Pack (every objective is worth 1 point and one objective is worth 2 points, in this example let’s assume one of the objectives closest to our deployment point was worth two points, so it won’t influence our example. Deployment map below).

We have 3 fighters in Dagger, our opponent has very similar warband with also 3 fighters in Dagger. Our deployment color is blue and we have 1 fighter on each of the bottom objectives and our opponent has 1 fighter on each of the top objectives and the middle-right one. With our last fighter we can reach both center objectives. Where should we go (and why) assuming that the fighter we have to activate and opponents fighter on the center objective are both weak fighters that most probably can’t hurt themselves much?
The answer to this question depends on 3 factors:
- Which warband will have more fighters in the next round?
- Who will be able to reach center objectives next round?
- What are your options for next round?
In such situations its better to “split” control over central objectives if you expect to outnumber your opponent next turn and if you think you will be outnumbered do the opposite and go where his fighter is to equalize. In case you outnumber your opponent but due to inferior mobility your opponent can reach this objectives with more fighters then treat it like he would have more fighters and vice versa. If you play very slow faction then it can also influence your plan as sometimes you simply can’t afford focusing on certain objective if it would severely limit your ability to reach other objectives next rounds. Last but not least – if going to one objective means being the only fighter positioned in threat range of certain “scary” model then it may be smarter to consider other options. On the other hand you may want to lure some fighters into places from which they will have lesser impact on the map (for example limiting the number of objectives where opposing Vampire Lord can resurrect his Skeletons may be a game winning “gambit”)
Let’s examine why “splitting” control is more favorable to the player with more fighters in the area. In case each player controls 1 of two center objectives the player with more fighters can use activation advantage to make sure last activation will be on his side and to win both objectives that turn he simply require to invest only one more fighter than the opponent by matching the number of fighters on previously “conquered” objective and putting one extra fighter on the one scored by the other player in previous turn. If previous turn would end with both players competing for the same of center objectives the players with more fighters would had to invest 2 fighters more than the opponent to win both objectives. That’s why when you outnumber your opponent is generally better to split so you only need one extra fighter instead of two to gain big advantage next turn and when your opponent has the numbers force him to “invest” one extra fighter to steal the objectives. Of course as I mentioned above there are “exceptions” but it’s good to have the situation I described in the back of your head when playing objective missions and preparing round 1 plans.
Generally if you intent to do well in objective missions its good to prepare numerous warband to gain advantage early, during first two turns and then capitalizing on activation advantage and the fact that your opponent has to catch up in points which puts additional pressure on him, or just the opposite – prepare for the war of attrition and gain numbers advantage over time through killing opposing fighters (which I believe is harder to do). Of course in scoring objectives happens only last round then the first approach changes to “survive with as many fighters as possible and jump on objective near the end of the game”. More on scoring timing later.
1.2 Treasure Mission
With treasure missions its important to remember if there are any additional rules like for example treasure carrier receiving D6 damage at the end of his activation in Core Book’s Cursed Relic, or having to spend an action to loot a treasure and not being able to drop it in already mentioned Loot and Pillage from Rumble Pack (which by many is considered to be the best treasure mission so I suggest to check out Rumble Pack for it).
For classic treasure mission you need a dedicated fighter that you plan to grab treasure with. Some factions have access to a teleport ability and its definitely the most valuable in treasure missions, so if your faction has access to such tools I strongly recommend to include at least one teleporter in your warband. Two most popular teleporters are:
All Tree-Revenants (often called Teleport-Tree) have access to powerful triple that let them teleport out of engagement range and put the fighter anywhere over 5″ away from enemies. The leaving combat part is what makes this ability great as you really need to prioritize initiative hard to catch Tree-Revenant before he can teleport the treasure away. Next popular teleporter is Dreadblade Harrow.

It has access to way weaker version of teleportation (also a triple) that doesn’t let him to teleport if there are fighters within 3″, which combined with the fact that you can’t disengage when carrying treasure (which makes teleporting tree so powerful) makes pinning him down way easier. But if a player controlling Dreadblade Harrow wins initiative then the opponent will have to travel a long distance to reach it, which can win games against slower opponents on its own.
The fact that this kind of abilities exist and are quite common in competitive list forces you to include at least one dedicated treasure hunter that can move fast and if necessary can pin enemy with treasure long enough until reinforces will arrive (ideally killing the treasure carrier on his own).
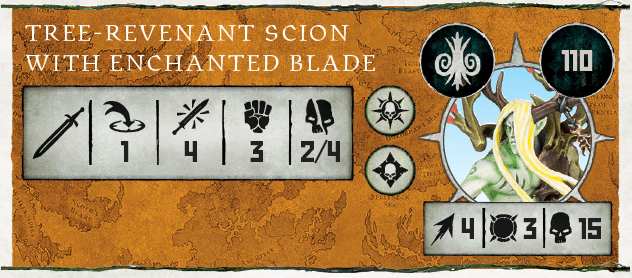
In case you grab the most treasures thaere is other class of abilities that you should be aware of – Pull abilities. They exist mostly in Chaos and the strongest and most common is Slaughterpriest’s (from Khorne Mortals faction) Bloodbind
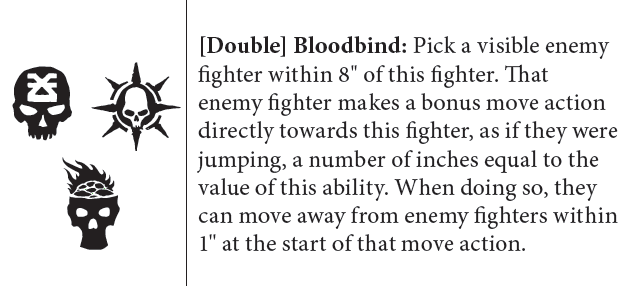
Similar versions of this ability are also available to Beast of Chaos, Untamed Beasts and Idoneth Deepkin Warhammmer Underworlds warband. The best way to make sure that your treasure won’t get pulled into your opponent forces is to “bodyblock” your own treasure carrier with your other fighter as during the “pull” your miniature can’t move through other miniatures.
There are few other advice I want to leave you with so you are well equipped to fight for treasures:
- Initiative in first round is the key, strongly consider spending wild dice to contest it or to make contesting it impossible for your opponent
- When positioning around opposing treasure carrier try to avoid staying 1″ from other enemy fighters so in case of killing the fighter with treasure you can use move action to pick it up right away.
- If you expected to kill treasure carrier with your first action and the dice screwed you consider if killing him with second action won’t lead to other enemy fighters stealing the treasure next activation
- In situations from the point above keep in mind that “Inspiring Presence” can be used to secure the treasure with your opponent not being able to pick up the treasure after your first activation
- In games with more treasures Inspiring Presence is a great way of grabbing 2 treasures “at once”

1.3 Kill mission
There are many types of kill missions, in some of them you have to kill certain enemy fighters chosen by the battleplan (for example enemy leader or the whole deployment group), in others players select which fighters they will try to kill and even missions when you select your fighter and if he can outdamage your opponent’s “chosen” you score points.
Because of this variety its difficult to provide general strategies but here are some things to consider:
- You don’t have to be the aggressive player, if your opponent will come to you then you can spend less actions than your opponent on moving and more on attacking. You can use range abilities and attacks to force your opponent to come to you otherwise there is a threat of you gaining lead with ranged damage and then running away the whole game
- In case of movement/range advantage you can move to places where your opponent can’t reach you with move-attack combination and you can reach him
- In case of gaining early advantage keep in mind that running away will force your opponent to come to you
- When the point cost of slain fighters is important for scoring remember, that if you kill something big, engaging your opponent best fighters with your cheapest ones could ensure that they won’t catch up on “killpoints”
- Inspiring Presence in first 2 activations of the round can be a great way to kill key enemy fighter before he can disengage and flee
- Resurrection can “cheat” in some kill missions, so always include it in your planning against Death factions that can do it
- When you Move-Attack against certain factions positioning before the attack is key. Skaven can disengage before you attack with their reaction, so if there is some terrain around make sure to finish movement in base to base contact with them with the terrain behind their back (this way nearby rat won’t let your target disengage as they must end such action at least 3″ away from you, which in case of base to base contact mean a streight line move). Similarly when playing against Orruks, Gitz or Death/Chaos thralls make sure to finish within 1″ of your intended target (I’m speaking about fighters with bigger attack range that usually prefer attacking from distance), otherwise their reaction can bring their other model within 1″ of you and you will have to attack it instead
2. When is winning condition checked
The moment of scoring doesn’t matter for treasure missions as the fact that the player controlling treasures in last round get the points is not changing the importance of fighting over them for the whole duration of the game. I would argue that despite the fact that scoring happens at the end of the game the very beginning is the most important as who will grab which treasures and where they end up after first activations of the game will dictate all future turns.
The situation changes drastically in objective missions. Having mare fighters than your opponent at the start of the game doesn’t mean it still will be the case after 4 rounds of play, that’s why “staying power” and “power projection” are very important when objectives are scored only last round. Ability to win fights across the map is key for less numerous warbands and the advantage in melee usually means that horde warbands often try to avoid combat at all cost with the weakest fighters to preserve as many models as possible until the critical last round. This is why the fighters that you want to kill enemy “squishies” with should have a way of getting to its intended targets.
With kill missions the importance of scoring time depends heavily on the battleplan description. As I mentioned previously it’s important to remember that in most kill missions the side with early advantage may suddenly start running away to deny opponent ability to participate in Victory condition. All sorts of ranged damage also may force opponent to play aggressive so always keep an eye on ranged attacks as few lucky dice rolls can have a huge impact in kill missions.
3. What is the number and location of key map areas
Of course every place where a fighter with treasure goes instantly becomes key area, but as moves of fighters from both warbands are quite unpredictable I suggest to only focus on treasure starting area and maybe potential directions where the treasure could go based on deployment points. The number of treasures is key information as based on that we should decide on the number of good potential treasure carriers in our warband. Trying to catch all objectives is usually a very bad plan, but in missions with more treasures (like for example Loot and Pillage with 6 treasures in play) it’s great to be able to keep most of your opponent’s treasures in a threat range of your fighters. The most comfortable you can be in treasure mission is to have the treasures you control far outside of your opponent reach and all of remaining fighters around treasures controlled by the opponent. To prevent such comfort from your opponent it is great to have some mobile fighters (like for example Dire Wolfs) that can quickly move to the other side of the board and engage a weak fighter with a treasure. Even if the chance of Dire Wolf stealing treasure from your opponent isn’t high it may force him to use some ability dice to ensure that your Dire Wolf (or any similar fighter) won’t ruin his game. The number of treasures also has huge impact on first round initiative, the more treasures the less important initiative is. Remember that even when your opponent wins initiative you can still grab more treasures round one with Inspiring Presence.

In kill missions the importance of certain areas of the map depends only on location of the fighters so there is nothing to discuss here, as you can’t actually plan much.
Similar to the timing of objectives the number of them changes the game drastically. With single objective in play you can position to “bodyblock” the area of the objective so there is limited space where your opponent can stand to contest the objective. With higher number of objectives activation advantage grants more options as it forces the player with less activations to commit to objectives early and activations after the other player has finished his moves became simply a math problem on “how do I score the most points?”. Of course to have such situation the last fighters to activate must have possibility to reach different objectives. Knowing this if your opponent has numbers advantage you can adjust the target priority of your attacks to eliminate fighters that give your opponent more options at the end of the round and in perfect situation make him unable to capitalize on activation advantage due to lack of options after you run out of your activations. Bigger number of objectives can also be used as a way to increase your fast fighters durability by forcing your opponent to use move action to chase your fighters over different objectives. For fast fighter sitting on the only objective it is way harder to gain value form its mobility than in 6 objective mission. The number of objectives also dictate how powerful You messin’ ability is, as it can change the one objective mission against hordes to a kill mission for a horde player (prevent every Brute from reaching objective or lose the game) or be barely impactful in 6 objective missions.
4. Distance between key areas of the map and deployment points
The most obvious conclusion from checking the distances to key areas of the map is the movement characteristic that your treasure carrier has. If dedicated treasure carrier can’t reach the treasure then something went horribly wrong. With many treasures on the map if you can’t reach any of them within your opponent reach you decrease the pressure put on the other player. Try to prepare your list (especially the way you split deployment groups) to maximize the numbers of objectives that you can steal from your opponent.
In kill missions the most important distance is how far your opponent deployment point is. Based on that you can try to predict the impact of potential Rampage for both players and deploy accordingly.

Checking the distance between deployment points also lets you prepare the ambushes for fighters that will enter the battlefield next round. Such ambush doesn’t have to damage your opponent – hiding goblin netter around area where enemy monster will be deployed next round may potentially win you the game in case of successful usage of ability.

The distance between deployment points and key map areas are not the only important ones. In objective missions the distance between objectives will tell you if you can contest 2 different objectives with single fighter with big enough base to be within 3” of both of them. For example in Supremacy from Rumble Pack there are 4 areas where cavalry base (basically any 2+ inch long base) units can contest 2 objectives.

Knowing this you can position your fighters in a way that would prevent your opponent from abusing this tactic against you by moving your fighters to the edge of objective closest to the nearest objective. It’s a great play to have in your arsenal and if possible keep this in mind when constructing your warband.
If measuring such distances doesn’t seem easy for you then here is the fastest way to do it – check vertical and horizontal distance between two points that you want to measure distance between. Deployment map will have all the information you need, the only thing you need to know is that the board size is 30”x22”. Next google “calculate triangle online” or simply use the same page as I do: https://www.calculator.net/triangle-calculator.html. Set the angle to 90 degrees and put the horizontal and vertical distances on the edges next to the 90 degrees angle (the order doesn’t matter). After you click Calculate the page will show you the value you wanted to calculate on the 3rd edge of triangle as in example below (I put 11 and 5 as my values):
When looking at battleplan map some distances are quite difficult to understand even after calculating all the distances and to figure them out easier I suggest to stop treating deployment areas and objectives as points and start looking at them as circles. After looking at the battleplan drawn this way your intuition will have way easier time, example below (its Spoils of War from Rumble Pack, one square = 1″)


5. When each deployment group is deployed
This information is not only key in setting up potential traps as mentioned before and deciding which battlegroup is best for your treasure carriers, but especially in deciding whether or not uneven value distribution between your deployment groups is profitable. For example when you compare the time when scoring happens in all Core Book Battleplans then it’s quite obvious that your most impactful fighters should be in Dagger as it always starts the game first round in all missions where scoring also starts first round and also in all treasure missions (it’s also always the closest to treasures). In such situations you aren’t punished for putting all eggs into one basket. In case of more balanced deployments splitting your forces more evenly will be better, unless you want to gamble a bit. Of course the situation I describe changes based on the battlepack, but in case of randomly drawed battleplans gambling with deployment groups power will have much bigger impact of potential results.
Fighters that are affected the most by turn of their deployment are monsters that usually cost significant part of the whole warband. In rare case when some deployment group starts in third round having the monster in wrong deployment group can decide the game on its own.
