Test of Champions is a set of 3 matched play missions released in White Dwarf #490 (Available as always in battlepacks tab on top of the page or directly through this LINK). I don’t think this missions are well designed and they feature some of the worst characteristics a matched play battleplan can have, but for casual play they are fine. I will not try to build the strongest possible list (which for the reasons I will list in a second is a Chimera list), but something that is both competitive and (to some extend) fun to play and play against. To make it more interesting I will also try to use some less popular fighters. Let’s start with quick missions overview:
Battleplans
Cursed Prize is a mutated version of Cursed Relic with Supercharged Curse on the treasure. The single treasure is either splitting in half the number of wounds of fighters around it or dealing the damage equal to half of remaining wounds of its bearer to everything within 3” of it. The obvious conclusion is – if you take fighters with low number of wounds you will either – not do much damage to opponents that will gather around to steal your treasure or in case the opponent will gain control of treasure your fighters can be nuked with one “tick” of the curse. This means a lot of wounds = good.
Altar of ascendancy is a platform in the middle of the map that grants victory to the player that will be the only one with fighters on top of it at the end of the match. There is also additional mechanic of throwing fighters down from the platform that require high strength and low number of wounds characteristic of the target. Due to smaller fighters having to survive in the same area as the biggest enemy guys some durability might be required. Activation advantage in last round might guarantee a tie (in case there is enough room on the platform and the platform wasn’t demolished), but a good chance for a tie isn’t the best battleplan so I would say that this mission favors “killy” elite lists. Key note here: if there is no platform you can’t lose – “Go Monsters!”
Brutal Conquest is the last mission here and it has serious perspective for truly “brutal” outcome. The fact that the “Forge a Legend” ability that basically grants the fighter Rampage after EVERY kill is not locked to non-monsters mean that if you don’t have the most durable fighters enemy Chimera can basically table you in round 2 with single activation (Kill -> bonus rampage after kill -> bonus rampage after kill -> …). The chance of killing 20 wound T5 fighter in one swing of this monster is 81,24% (you can improve that number with blessings), so this situation has extremely scary chance of actually happening and has very easy requirements for Chimera player. Generally, the mission is won by the fighter that can do the most damage and the counting starts after first kill so generally the longer you can stay deathless the less damage opponent can deal and count towards scoring. Once again, a lot of wounds = good. There is also the fact that once you have your killer every enemy fighter within 4” of battlefield edge is slain automatically (and counts as that killer victim towards Victory Condition), so the battlefield is effectively halved (only 47% of the map area is over 4” away from the edge), which mean there is no place to hide chaff models and netting deployment group that arrives in second round is a powerful play.
As the battlepack itself is not mentioning anything about minor/major Victory I expect the usual “half of winners warband dead” threshold, which with missions that favor Elite fighters to extreme extend and especially in situation where monsters can “exploit” battleplan mechanics means that 3 fighters seem like a good idea (in monster vs monster matchups activation advantage is everything, but we are not trying to brew the tournament winner here), so you have to lose 2 fighters to be denied major victory. Also in Brutal Conquest “scoring” starts after you kill someone and with 3 fighters it is way more difficult to kill anything. It might not be the strongest argument to go for 3 fighter warbands (activation advantage again), but if there is a battlepack to do it, its this one, so we are doing it anyways 😉
Grand Alliance Death
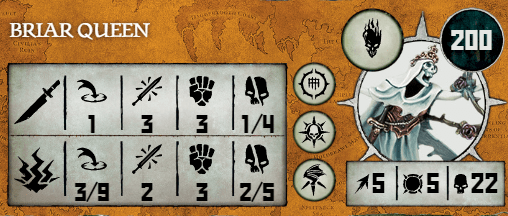
With single treasure in play teleport is one of the best abilities you can have, so let’s start the list with Dreadblade Harrow(235) – the only teleporting fighter in Death and Zombie Dragon(540), because ghosts need every help they can get (other lists won’t have monsters, I promise). As Zombie Dragon suffers greatly from being bracketed let’s try to invest last 225 points in some protection for it and Briar Queen(200) and her Howling Vortex might help with that while being quite durable at the same time (the only T5 ghost). Howling Vortex can lower the speed of a titan from relatively safe distance to keep Zombie Dragon or Teleporting Horsie out of attack range, while dealing the same damage as dreaded “Engulfing Flames” from Horn’s of Hashut.
Let’s summarize: In case that Altar of Ascendancy seem unwinnable you can improve the triple to quad to destroy the platform forcing a tie. Teleporting 10” move fighter that can fly is one of the best treasure bearers in the game and Zombie Dragon seem like a strong contender in Brutal Conquest damage competition, especially with option to Drag and Maul people into kill zone.
Dagger:
Shield:
Hammer:
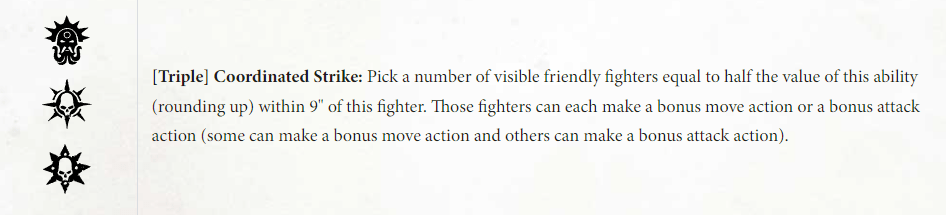
Key Abilities (all triples):
Grand Alliance Destruction
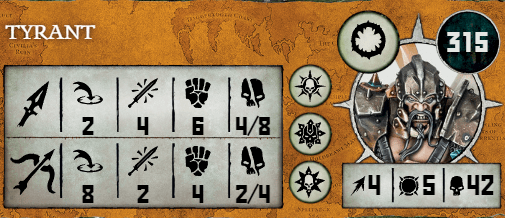
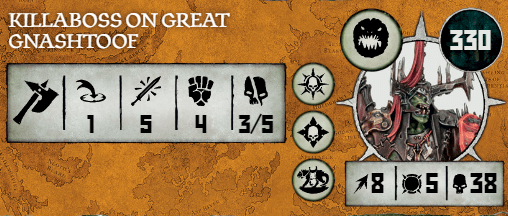
I already mentioned that nets are powerful and we want a lot of wounds on our fighters so let’s start listbuilding with the most reliable (2+ instead of usual 3+) netter in Destruction – Torka Tuffskull(125) and the beefiest Kruleboyz leader – Killaboss on Great Gnashtoof(330). We will finish the list in true destruction soup style – with the strongest ally we can get – Tyrant(330) and invest the remaining 230 points in the most efficient fighter possible and at that price range it will be Orruk Megaboss(225).
Tyrant is the biggest damage dealer you can get in Destruction, so Brutal Conquest is “covered”, especially as you have Torka’s 2+ net that can use the 4” kill rule to “assassinate” opponents with little to no counterplay in case of winning initiative in round 2. Torka and Killaboss can also both use their reaction to punish enemy attempts to climb the Altar.
Dagger:
Shield:
Hammer:
Key Abilities (all doubles):
Grand Alliance Order
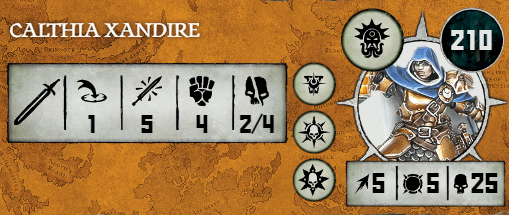
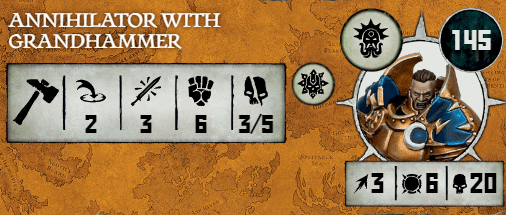
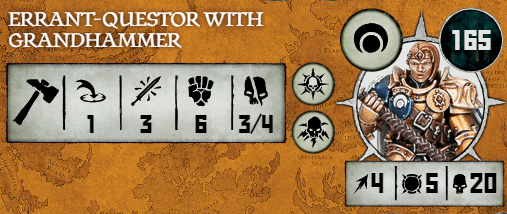
The problem with Order is lack of Titans and I don’t want to use Kharibdyss, which leaves very little space. Paladins could be great, but I think S6 is the key when fighting the most elite fighters, so Annihilators it is. I fear this will be the least original of the lists, but I didn’t see such list before so here we go. Damage potential is very important here, so let’s build around Annihilator Prime (S6 one) and grant him bonus actions with both Calthia Xandire (unoriginal, I know) and Errant-Questor with Grandhammer. This way with double and triple in the same turn we can have our key fighter perform 4 actions in a turn. The rest of warband will be filled with Annihilators (one has to have shield due to points and we run out of hero slots, so not much options left)
The plan for most missions is simple – win through “cheating” actions and incredible efficiency of Annihilators. They might be slow, but with potential for 4 move actions they can surprise. As this is a variant of Thiccboi Cardio I don’t think there is much to explain as this is fairly popular kind of list. Also the usual Stormcast problem of “6-7 slow guys that are always outnumbered” is not a case with such elite heavy bias. Now when I think about it I don’t know why I didn’t go for Thundercats list as if there exist a pack for them it’s this one.
Dagger:
Shield:
Hammer:
Key Abilities:
Grand Alliance Chaos
I just realized that Divine Blessings (optional rules from White Dwarf #490) might be available for some folks (hopefully our local tournament with this “silly missions” will not feature Blessings. Yes I really don’t like them as they make cost efficient fighters even better and actually widen the gap between best and worst factions), so let’s use them in the best possible way – the fun way. With Victory in one of the missions relying on moving fighters to single platform there is a great reaction that is actually never used as sacrificing the action of a fighter that has access to it is basically never worth it. I’m speaking of Fomoroid Crusher reaction – Unthinking Destruction.
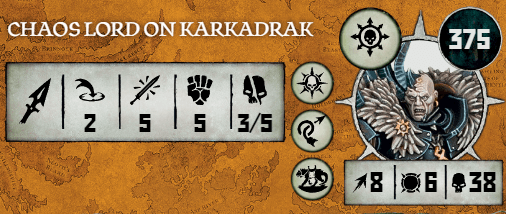
Let’s use blessings to build around this reaction. If we want to all in around that we will need 2x Fomoroid Crusher(520) and enough points (60) for “Spite” reaction that grants one free reaction each battleround. In case you are not playing the Altar for the same cost you can use more traditional +1 Attack or cheaper +1 Toughness in case there is a Chimera player around. For the remaining points (420) we can afford the most expensive (nonmonster) fighter in the whole grand Alliance – Chaos Lord on Karkadrak (375) and still have enough points for any Blessing we want on him.
The general plan for the Altar would be to park Karkadrak below the Altar and force enemy fighters to fall into his loving arms with Crushers reactions while trying to keep them on the top. In Brutal Conquest Chaos Lord with his speed should be able to catch more vulnerable targets and opponent will have to kill one of your titans to even start scoring any points which should take some time. In the treasure mission you can afford 2x extra wild dice Blessing if you want to win initiative first round, so despite only 3 fighters this list is quite flexible.