
There are missions we all love (Loot and Pillage), there are missions we all hate (The Cursed Relic) and there is a lot of in between, sadly there are also battleplans that could be loved, but aren’t popular enough so many people simply never played them. As far as content creators “screen time” is concerned there definitely isn’t enough time spent to put some spotlight on underrated, hidden gems that deserve way more love than they get. The mission I will focus on today is not that “underplayed” as the beginning of the article suggest, but is certainly underrated. By underrated I don’t mean that people generally dislike it, quite the opposite, I heard a lot of people like it and barely heard any complains. In my opinion “good” doesn’t give it justice as in my mind it should be treated and respected as a “lighthouse guiding battleplan design” or in other words – one of the best battleplans in the game. For those that never heard about it, its a part of theSaltySea battlepack called TidalPack (if you want to find certain battlepack then the Battlepacks Tab on top of the blog is probably the fastest way to get there).
Thief mechanic
The heart and soul of this mission is the thief mechanic, a very simple concept that leads to many interesting decisions. It can be explained in one sentence “Pick two enemy fighters, they get treasure and if you kill them you get points” and unlike half of the modern battleplans you don’t need to remember about 15 different rules in the mission description, scoring methods, catchup mechanics, twists and rules alterations just to end up with a game of “who forgets less”. The fact that the mechanic works very close to how we would intuitively assume it does, has a fitting and simple name that also works with the battleplan name is an icing on the cake here. I really love that its the opponent that makes the decision so you have to keep that uncertainty in mind during listbuilding.
Strategies
Combination of getting the treasure and becoming the target that grants VP after getting killed mean that you can use your thief choice in few different ways. Firstly you can go with a “standard” approach and pick the easiest to kill targets so the points for killing the thief are the easiest to get and in case opponent wont drop the treasure it shouldn’t be that difficult to steal it too. It will often result in the thief dropping the treasure so someone that can defend it better can pick it up (expecting this situation you can include a direct counter in your list, for example including a Prosecutor in your Ruination chamber warband prevents your opponent from dropping a treasure as thanks to teleport double and 10″ move you can steal and move it very far for a cost of a double – trying to counter this by selecting the teleporter as a thief doesn’t seem like a smart idea, so the plan is quite solid as soon as you can delay your teleporter activation and you keep the number of activations close). The other strategic use for your thief selection is using your opponent biggest threat as one of the thieves. This way you most likely will focus on the other thief and his treasure to win the game and picking the biggest enemy model is intended to slow it down and prevent from stealing your treasure or force it to lose an action for dropping the treasure. Granting VP when killed deincentivize the threat from aggressively charging into your forces. You can also control your opponent choices by taking very elite warband. With 3 or 4 model very elite warband you can only have 2 models your opponent can pick from, so you can make the decision for your opponent in the listbuilding stage, which gives you big preparation edge over your opponent. Slightly bigger but still elite warbands can do that quite successfully too. Last but not least – you can use various battle traits to remove already deployed models and deploy them next round and as I already used Ruination list as an example, lets continue with it – you could use the Stormcast battle trait to “redeploy” your Gryph-Crow so it can’t be selected as thief.
Lists
I already mentioned 3/4 model elite lists. I would definitely not want to play this mission against a 3 Tyrants list, but the other side of the spectrum is also quite scary as 15 models swarm can bodyblock access to its thieves for ages while at the same time focusing all the ability dice and part of its numbers to hunt for one of your thieves. Having the widest possible range of viable lists (between 3 and 15 fighters) while also finding great use for often forget and underused abilities like healing makes this battleplan a joy to listbuild for.
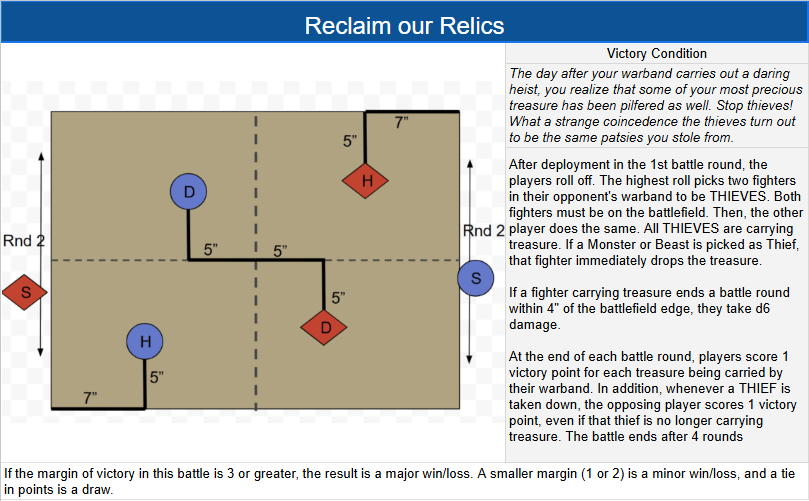
Deployment Map
One of the strengths of this mission is definitely its deployment map, with round 2 deployment (that is often the least impactful) playing a huge role in flanking the thieves. Distances between deployment groups (13,04″ and 14,14″ from Dagger) doesn’t prevent first round Rampage from being effective, but still limits its power on slow fighters and the difference in Dagger and Shield deployment positions in relation to the opponent (Hammer is way more distant from enemy Hammer, but is actually the closest deployment group to enemy Dagger, there is also 3″ difference in how far from Shield reinforcements they are) makes them play differently, which is great. Distance to opponent makes shooting strong here, but flanking Shield can quickly limit its effectiveness. Pinning enemy treasure carrier first round to keep it in place is an option so decision whether to reposition the treasure or wait for enemy to pin you down to then use activation advantage to drop the treasure (with no risk from your opponent stealing it due to no activations left) and disengage adds to a number of meaningful and interesting decisions you have to make.
Minor/Major Victory
Lately I’m no longer a fan of Minor and Major Victories, but having the clear way of determining it will make some people abandon the “core book way” which is definitely a good thing.
D6 Damage
This is the part I like the least about the mission as it limits the value of speed and adds unnecessary randomness, but I can’t deny that it leads to more fights and more action in general. I removed this part from the version of this battleplan I “borrowed” to my last battlepack, but mainly due to lack of space as for printable version I wanted to fit 3 battleplans per page and this one had slightly too much text. I must admit that despite my feelings towards it balancing the risk of staying closer to enemies or getting hit for D6 damage is something that adds to the depth and some players would certainly like this.
Letting strong stuff be strong
There is some strange belief in the community that limiting the effectiveness of strong plays/abilities is a good thing, which you can see in a general enthusiasm towards the additional limitations added to battleplans like for example removal of “doubletapping” objectives or removing the option to drop treasure in Loot and Pillage (there are other examples, but this are the most popular ones). While there are no direct limitations here (you can use battletrait to escape thief selection and there is no rule preventing you from dropping the treasure) the D6 damage makes teleporting the treasure away way less powerful, which is another reason I’m not a fan of the random damage part (it makes the battleplan a bit more balanced, but I believe that limiting the strength of your most powerful toys limits the fun and fun should be 1st priority in a game).
Closing thoughts
Overall the battleplan leads to fun, actionpacked games, where interesting decisions start even before your first activation. You can expect a lot of very impactful dice rolls and the number of strategic decisions you have to make definitely grants a lot of room for skill expression not only on the table, but during listbuilding too. In my opinion its a brilliantly designed mission and if you haven’t played it – you should definitely give it a try.
As always thanks for sticking to the end and I hope reading it was fun and inspiring. If you are a TO looking for a good treasure mission I hope it helped you. I was planning to publish “How to overprepare for a Path to Glory tournament” instead of this article, but sadly our local event was cancelled, so I will publish it later (hopefully on the day of our next local event). If you like the content I produce you can support it through Patreon and be mentioned here.
