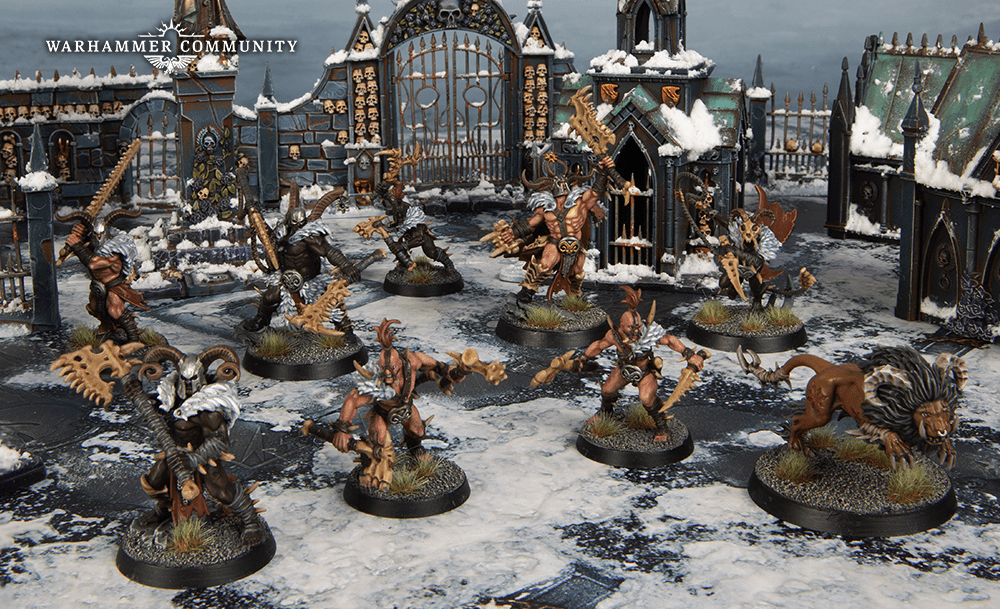
Today (or at least at the day of this article publication – 13.04 at 11:00 CET) the biggest annual Polish Warcry tournament is taking place in Warsaw (all the list and results are available HERE). 40 players submitted lists, so it will most likely be one of the biggest match play events in Warcry. This text is documenting the overcomplicated and needlessly complex way I overanalyze the battlepack and predict tournament meta to gain some form of advantage, so lets dive straight in. (I assume the reader to know Warcry jargon and “competitive language” of the game. In case something is not clear I suggest checking the Warcry Dictionary)
1. Limitations
Monsters are banned and due to very limited hobby time (I have 2 month old baby at home and TO published tournament pack very late, so there were only 3 weeks of testing before list submission deadline) I will not consider warbands outside of my collection. Painting few missing models is fine – starting new faction is sadly not an option. This limits my options to: whole grand alliance of Death and Destruction and half of Order (Chaos options I have do not fit the battlepack well, so I won’t bother mentioning them).
2. Tournament Pack
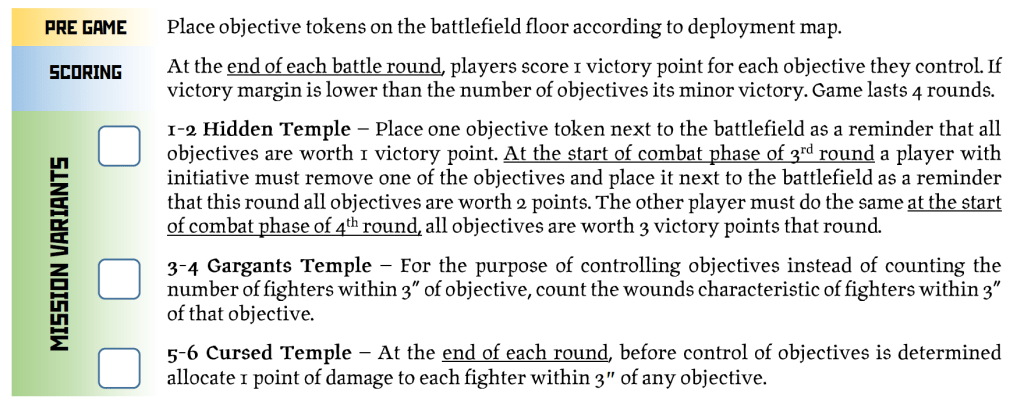
As Listbuilding is strictly connected with battlepack, let’s start here. We will play 4 rounds with every round randomly drawing a mission from a pool of two. First round is one of 2 missions from Mark of Chaos battlepack (designed by me, link HERE), next 3 rounds will use 6 different missions from Tidal Pack 2 (I will call it this way as theSaltySea yet not published the second iteration of his pack, so they might change in “official” release). Lets take closer look to the missions. I will shorten the descriptions, if you are interested with full pack, its available HERE. Devine blessings (“fixed” during listbuilding) are allowed.
During first round will we will play one of the missions below:
Battleplan 1A
Treasure mission with treasure holding scored every round (1VP), additional scoring for killing treasure carriers (1VP) and Twist dealing 1 wound to everyone within 3″ of treasure every turn.
Battleplan 1B
Kill mission where every round you pick a different fighter and compare his damage from attack actions (only) with the output of the fighter selected by your opponent. Higher damage grants 1VP and in case difference is higher than 5 you gain 2VP. The Twist lets you (you chose before the game) roll 8 initiative dice at the cost of wild dice generation.
Mission pool for second round:
Battleplan 2A
Treasure mission where you pick 2 enemy fighters that will carry treasure. Killing selected fighters gives you 1VP and every treasure carried grants 1VP every round. Additionally treasure carriers within 4″ of battlefield edge get D6 damage every turn.
Battleplan 2B
Treasure mission, basically Loot and Pillage from Rumble Pack (original available HERE) with modified scoring. Each treasure grants 1VP for first 3 turns and 3VP in final round.
Third round will be drawn from:
Battleplan 3A
Treasure mission with 3 objectives that are removed from play after 1st time any player controls them. That player scores 1VP and one of that player fighters contesting removed objective now carries a treasure. After the game every treasure gives 2VP.
Battleplan 3B
Objective/Kill mission with central objective and 4 extra objectives placed by players. Controlling objective grants 1VP, additionally killing a fighter contesting the same objective also grants 1VP.
Final round pool:
Battleplan 4A
Kill mission where every round you select a target that you will need to kill this game. Selected fighters within 4″ of battlefield edge get D6 damage after every round and grant 1VP when killed with additional VP for having highest Wounds characteristic in game or being a leader.
Battleplan 4B
“Kill mission” that gives 2VP for every kill and 3VP for reaching objectives on opposite side of the map (fighter is then removed from the game).
3. Mission summary
Half of the missions are treasure missions, we have 50% chance for treasure mission during first and third round and second round will have treasures for sure, so there is 25% chance for 3 rounds of treasure missions, 50% chance for two treasure rounds and second round as only one with treasure in remaining 25% of situations. This means that treasure missions are the key for getting to the last round with the highest potential standing.
Objectives on the other hand are almost completely absent. Outside of 2 situations where objectives are used to get treasures (battleplans 2B and 3A) there is only one “true” objective battleplan (3B), that has the secondary scoring that rewards killing, so taking small and fragile fighters just to have more bodies on objectives looks like a losing proposition. Important aspect of the pack is that third round must have some objectives, so despite everything I just said objectives can’t be ignored while listbuilding.
Lastly, there are 3 or 4 battleplans that can be identified as “kill mission” with the final round having two kill missions to draw from. All kill missions have scoring constructed in a way that can’t be cheated by resurrection, so bringing a fighter back is not preventing opponent from scoring.
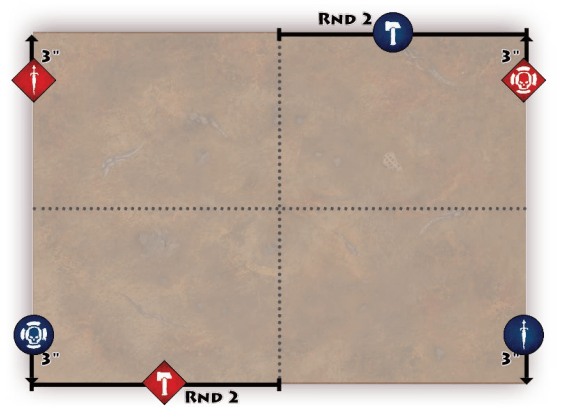
Deployment wise the maps are not balanced. Shield starts the game in reserve in half of the cases and Dagger is deployed R1 most often (75%) with Hammer in between them with 5 first round starts. Shield also starts first round in both cases where objective control is part of the mission. From treasure point of view the most important deployment group is certainly Hammer, as it is deployed first round in all treasure missions.
The general plan for listbuilding before diving into more details:
A lot of treasures per mission (3,4,5,6) require having few competent treasure carriers (ideal world is 2 primary treasure carriers in Dagger and Hammer and 2 secondary ones in Hammer and Shield)
Potential “objective tricks” should go to Shield
Damage and durability are the most important warband aspects, as almost all battleplans are kill or treasure based
Shield is the least impactful group
There is real opportunity cost connected with running easy to kill chaff
4. Battleplans analysis
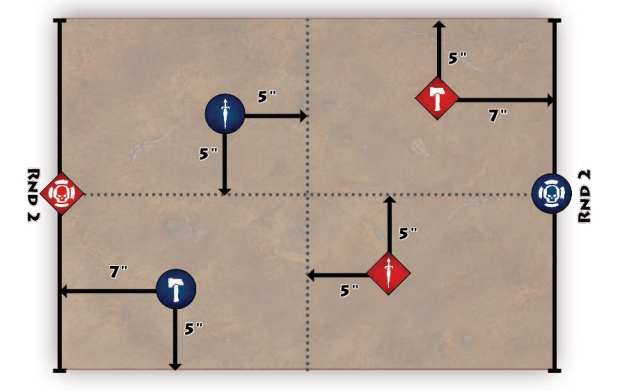
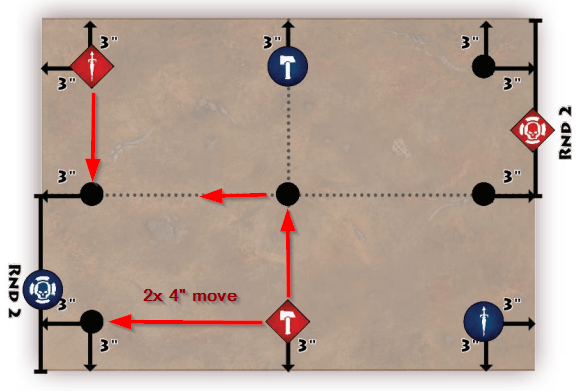
As far as deployment group position in relation to treasures and “lootable” objecives is concerned it looks like Hammer requires a big fighter to fight over key treasures and a secondary treasure carrier with at least 4″ move. Let’s look again at the only maps with known treasure position:
In the picture above I expect the game to resolve around center objective. I expect Shield to always be the weakest deployment group so both players should be able to overpower opponents Shield and keep the side treasures. The treasure in the corner of the map requires minimum of two 4″ move actions from Hammer or two 6″ move actions from Dagger, so it will be easiest to reach it from Hammer. In case of winning initiative moving the treasure as far away from opposing Dagger and Hammer is “default” first activation. Big fighter in Hammer is required to conquer one of the treasures in case of losing initiative (which means losing central objective in most cases) or to survive similar approach by the opponent in case of grabbing the central treasure.
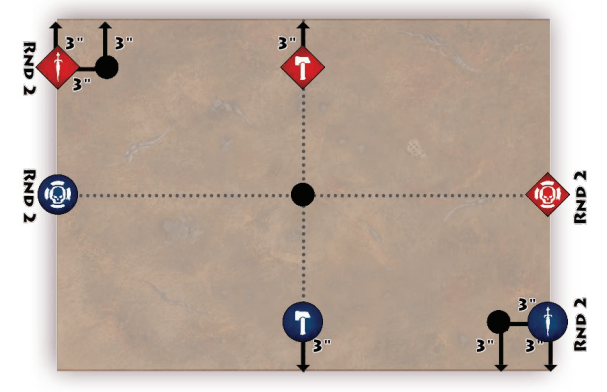
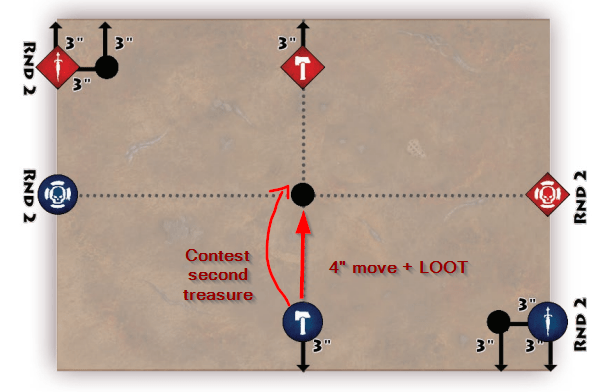
In the only other battleplan with “fixed” treasure position I would suggest the situation where the 4″+ move secondary treasure carrier is going first and the bigger threat is used to “countercharge” the opponent that will try to pin the treasure in place. In case of losing initiative (and no inspiring presence) the smaller treasure guy should secure the 2nd treasure and the big guy should contest the first one looted. This is the most scary mission if opponent has access to teleports, otherwise it often results in 2/3 isolated fights, due to expected Shield weakness instead of contesting the side treasures they might “reinforce” the fight in the center.
In the mission 1B it is a good idea to have a long range shooting in Dagger/Shield and some netters to prevent your opponent from scoring at all (with won initiative). For this mission best position for netter is Shield.
“Hiding” your smallest bodies in Shield lets you avoid selecting them as thieves in battleplan 2A. Focusing on treasures (in case thieves drop them) looks like the way to go.
With placing your own objectives if you create a triangle with exactly 6″ between objectives, then any fighter directly between them will be in range for all 3 (the math behind that require base radius of minimum 0,92″, which is basically every base in the game). This is very important for potential You Messin’ setup.
Last mission I want to refer to is 4B and from my (very limited) experience its better to engage the enemy as close to your gates as possible. Option to disengage from unfavorable combat and disappear in the gate is great, so some early and potentially risky moves straight to your opponent side of the board might not be the worst idea.
5. Grand Alliances and Listbuilding
Lets start with Death – abundance of treasures makes running Dire Wolves a great idea, as there is no greater fighter that can steal distant treasures for cheap.
Refresh of FEC gave treasure bearers a way out in form of “double teleport”
Usually I would look for tournament list candidates within Soulblight Gravelords, but the need for durable fighters and no possibility to cheat kill missions with resurrection moved my attention towards OBR, that was usually a close second choice.
The list I built (using warcrier.net) during my first attempt to “break the pack” looked like this:
OBR 1000pts | 10 fighters
Dagger
Necropolis Stalker with Dread Falchions (195pts) +1 Attack Blessing (30pts)
Dire Wolf (85pts, Thrall)
Mortek Guard with Nadirite Blade (55pts)
Shield
Mortek Hekatos (105pts, Hero)
Mortek Guard with Nadirite Blade (55pts)
Mortek Guard with Nadirite Blade (55pts)
Hammer
Abhorrant Gorewarden (225pts, Hero)
Dire Wolf (85pts, Thrall)
Mortek Guard with Nadirite Blade (55pts)
Mortek Guard with Nadirite Blade (55pts)
While it certainly has very powerful tricks to steal uncaptured treasures or even teleport away engaged treasure carriers behind enemy lines it lacks the punch to kill durable targets. Additionally the teleport trick is attached to 20 wounds, T3 body, which isn’t durable enough to base warband performance on. Numbers advantage, where this grand alliance shine the most isn’t that important in the pack. Changing 4 Mortek Guards to Stalker with Spirit Blades with +1S is not making the warband that much stronger, so the idea was dropped. The biggest strength of the whole grand alliance lies in powerful chaff (grave guards, skeleton warriors and mortek guards) supported by resurrection and both of this strengths do not fit the tournament pack well.
Let’s move to Order and just as previously lets look for great tools that can give us advantage. The first observation is that Sylvaneth abilities fit this pack very well. Teleport on cheap bodies to escape being pinned down with treasure, cheap nets to prevent opponent from scoring points in battleplan 1B, cheap archer to score points in R1 of the same mission and a heal that makes killing key targets way harder. The only thing they lack – bonus actions, can be obtained with ally like Calthia or a Questor. I would maybe try to play them myself if I would have any Sylvaneth models. I think my list would look similar to this:
Sylvaneth 1000pts | 8 fighters
Kurnoth Huntmaster with Greatsword (215pts, Leader)
Calthia Xandire (210pts, Hero)
Kurnoth Hunter with Kurnoth Scythe +1A (215pts)
Althaen (80pts)
Spite-Revenant (75pts)
Spite-Revenant (75pts)
Tree-Revenant (65pts)
Tree-Revenant (65pts)
I mentioned a Questor already, but unlike in other packs if looking for ally across Questors I would strongly consider the Duelist because he has the highest number of attacks (Strength matter less as I expect a lot of T6 titans, for five players traveling to the tournament from our local group we have three players with a FOMO/Varanguard in a list) and for his triple:
This ability has potential to decide the battleplan 4B or prevent opposing Hammer from getting to treasures in 1A and potentially do many other things.
The other Order faction that has great tools for this pack are Vulkyn Flameseekers. They are a bit “net resistant” in battleplan 1A thanks to all of them having ranged attacks that can be buffed by Ignite weapon.
I mentioned that I expect a lot of big T6 targets that might be required to win, Flameseeker Thanes have a great triple to serve as a “can opener”:
This ability is difficult to calculate on the fly, so the math on it looks like this: You have 26% to inflict 2*AV(ability value) + 4 damage or more; 40% to do 5 + AV damage and in worst case 33% for exactly 6 damage. With high triple (fives or sixes) this means that you have 1/4 chance to “kill” half of FOMO Crusher, if you are less lucky then you have 2/5 chance to take a third of his life. I like this chances. But lets not forget about treasures and this faction also has a great tool for them:
This ability and a mobile ally means that during single activation Drothmaster (fighter with this ability) can do a very high tempo play where the dwarf goes for the low hanging fruit in form of a close treasure and using this triple shoots an ally to a distant one, with an ally keeping all activation opponent must decide between engaging the ally to prevent it from running away with treasure or going for still unclaimed ones.
The list I tested to see how I like 2 mentioned triples:
Flameseekers 1000pts | 6 fighters
Bloodwrack Medusa (275pts, Hero)
Vulkyn Runefather with Drothvault Greataxe (150pts, Hero)
Drothblood Thane +1 Move (155pts)
Drothblood Thane +1 Move (155pts)
Drothblood Thane (140pts)
Drothmaster (125pts)
The Drothmaster felt great, but the list was extremally triple hungry. I felt that I needed to use ability dice in every fight to gain an advantage. I might have liked the list more (and I plan to play more thane based flameseekers in the future) if not for the horrible dice rolls that ruined a lot of plays that should work. Good thing is that this experience led to buying new dice set and I no longer feel like my dice have the sixes removed from them. I also figured that with 6 bodies and no objective tricks I might autolose third round of the tournament. Thane profiles seem great to blend chaff and this sadly isn’t the tournament to do that.
The next place I would look for list ideas would be a Stormcast list supported by Calthia, but I feel like Stormcast fighters fighting against FOMO Crushers (I really do expect a lot of them) and Destruction Titans (especially brewgit buffed) will fight an uphill battle and low numbers that might be a problem during “objective round” and lack of “dirty tricks” like nets or teleports made me look for tournament list elsewhere.
Lastly lets look for answers in Destruction. First of all, we the amount of missions centered around killing (treasure missions are basically kill missions in disguise) there aren’t many better tools than Destruction titans buffed by Brewgit signature ability:
The first list I tested followed a simple formula: As many Destruction titans as possible supported by chaff with great abilities and my list ended looking like this:
Ogors 1000pts | 7 fighters
Crusher +1S (265pts, Hero)
Crusher +1S (265pts, Hero)
Crusher (245pts, Hero)
Boggleye (70pts, Ally)
Brewgit (70pts, Ally)
Quiv (45pts)
Bushwakka (40pts)
For the titans in a meta that I expect to be very elite heavy Strength 6 is a must to fight against T6 opposition from Chaos (and some from Order). Especially with a Brewgit on our side. I already won a tournament win Gutlord + Brewgit combo so I know how strong a pair of Ogor and Brewgit really is, but with 3 attacks the damage without any buffs was unreliable, that’s why this time its a priority to take titans with 4 attacks and this is why I moved to a cheaper option of Strength buffed Crusher.
After playing the list I was unhappy with chaff, as easy to kill fighters are a problem in some of the missions and decided to move to Ironjawz to get access to few better tools:
Tougher chaff in Ardboyz that wins chaff v chaff fights and can survive with treasure longer
Access to You messin’ for the “objective round”
Similar cost but tougher titan in Megaboss
After few different versions I ended up with the list below and this is the list I submitted to the tournament:
Waaagh! 1000pts | 7 fighters
Dagger:
Orruk Megaboss +1 Attack (255pts, Leader)
Orruk Ardboy with Ardboy Big Choppa (80pts)
Shield:
Orruk Brute with pair of Brute Choppas (140pts)
Orruk Ardboy with Ardboy Big Choppa (80pts)
Hammer:
Crusher +1 Strength (265pts, Hero, Ally)
Brewgit +4 Wounds (85pts, Ally)
Orruk Ardboy with Ardboy Choppa and Orruk-forged Shield +1 Move (95pts)
The blessings I took are for the following reasons:
I wanted my titans to have S6 and wanted 4 attacks for more reliable damage.
I needed a secondary treasure carrier with 4″ move, that’s also the reason for a shield on an Ardboy in Hammer
Extra Wounds on Brewgit adds extra body for You messin’ calculations and make my most squishy fighter less likely to die
If someone would wonder why I didn’t take two Megabosses, its to avoid two extra pointed targets in battleplan 4A.
There are some weaknesses in this list, like vulnurability to nets (IJ reaction can counteract it in some cases) or lack of ranged damage for first battle round of 1B. The first is not something most lists can avoid and as far as second goes then I have Brewgit to look for 2VP rounds later on. Maybe I could find a better list, but due to very late tournament pack publication, family situation and work related travel I had less time than usually in such situations.
6. Format
I was planning another “Overthinking Format” article, but due to limited time and “unsportsmanship behavior” that the format promotes I decided against that to not “promote” unwanted situations and decided to move my thoughts here. The problem I have with the format comes from 2 things:
Strength of Schedule tiebreaker coexisting with removal of major victory (minor and major defeat are still here)
Strength of Schedule tiebreaker coexisting with bonus tournament points for killing a winning player leader
Both points lead to a situation where the optimal (from both players perspective) game result is a victory + minor loss with winners leader dying. Strength of Schedule tiebreaker puts you higher when your opponents get points and during a game you can “grant” this points to your opponent (when winning) at no cost to your game result. I don’t like the system where the winning strategy is to win by as little as possible and I don’t know what I will do during 4th round with the knowledge that dropping a treasure so my opponent can get minor victory is a “correct” play. The fix for kill a leader problem is simple – grant extra points to a player that killed enemy leader and didn’t lose his. For the other problem I don’t have solution, as I get why they did it and I kinda agree with the reasoning behind it (removing advantage that experienced player gets when facing a newcomer), but maybe removing the major win from only the first round of the event would be enough. I know it isn’t the big problem as most player will not look for such “exploits”, but with potential for few 4-0 players the tiebreaker situation should be rock solid, especially with event this big.
If you are interested why the bonus points for killing a leader were not included in listbuilding, its because the TO added it after I was done with listbrewing and I was testing my final list, so my leader having T5 and 35 wounds might cost me some “tiebreaker points”, but at least its difficult to kill for the purpose of battleplan 4A.
7. Expectations
I will do my best to win, but with the complex pack that is very difficult to “solve” I won’t get a (over)preparation edge I sometimes get, or have less of it than I would like and due to very limited testing time I don’t see winning as a realistic expectation. Best players from all over the country will come, so I expect all games to be difficult and exciting. The name of the paragraph demands some answer so my humble/arrogant (depending who you ask) answer is: top quarter of standings. Wish me lack and I hope my new dice set will not disappoint me like previous one did.
As always thanks for sticking to the end and I hope you found some value/entertainment in my text. I will soon update this part with my tournament score and we will see how right or how wrong I was.
EDIT: I ended up 6th with 3-1 score =) more details soon
Because of 3 year release cycle for Games Workshop games we can expect new edition somewhere in the middle of next year. It means that due to long time of product preparation (that hopefully involves a lot of testing), manufacturing and shipping its probably the last moment we can try to influence our beloved James Workshop with our hopes and wishes for new edition. Below are the 3 things I would love to see in next edition (that start with letter B, for no reason at all).
First B: Blessings
Blessings provides increased granularity across statblocks and one goblin can finally differ from another one without referring to elements outside of core game mechanics. This kind of profile change is the essence of narrative gameplay as rules(profiles) can now change according to story in an organic way (If you don’t know divine blessings – it’s the optional rule implemented in White Dwarf magazine. As with all other rules its available on Warcier HERE). For matched play blessings are even better as they provide additional avenues of skill expression and increase the number of options. Blessings in their current shape are fine, but I would love to see them modified a bit and implemented in both matched play and narrative play core rules. First of all – it would be great to have access for “blessings” that decrease stats, so let’s call the new system “traits” instead. Negative traits could be used as a consequence of being taken down in narrative campaigns, which lead us to another change – Instead of current separation of no blessings in narrative and max 1 blessing per fighter in matched play I would love to see max 1 blessing per fighter in matched play and unlimited number of blessings in narrative play (fighters should start with only single one, but change over time). Outside of using negative traits as consequence of failures positive traits could be used as a reword, for example – permanently sacrifice X renown to gain new positive trait of Y. Other interesting idea would be to also attach some runemarks to traits. This could be a great balancing mechanism, as for example “Minion” runemark (assuming it is the runemark required for resurrection ability) could be assigned to negative trait so a player would have to pick if they want their undead units to be weaker, but resurrectable, more expensive with positive traits or use normal profiles without traits. Other strong ability (like Shambling Horde) could be attached to different runemark that is also granted through trait which would open the possibility of 2 warbands made of the same models to play very differently due to different trait choices. Signature and powerful abilities like nets or “Engulfing flames” for obvious reasons should not be available simply through trait choice, so some runemarks must stay on fighters. One last suggestion for traits would be to change the cost scaling from the current system where we have 2 costs per blessing to have additional step, like for example different costs for fighters that cost 0-80 points, 85-160 points and 165+ points (and maybe remove certain traits from certain pools, like for example: no access to +1A in highest tier and no +4 Wounds in lowest one). If blessings/traits would join the core rules I would expect some tokens representing them to be added to Core Book and starter boxes.
Second B: Battleplans
I mentioned many times that I think that Core Book battleplans are awful (they are so bad it’s hard to find the worst one as both Cursed Relic and Reaper are often mentioned as the worst missions of their type with Hidden Vault not that far from that in my opinion). Over time Games Workshop produced more interesting missions (with few great ones, like beloved Loot and Pillage), but struggled to balance the battlepack from skewing heavily towards single archetype. Hopefully if James Workshop is browsing any bigger online Warcry community he should be able to come up with decent set of missions, as event organisers went away from GW missions towards community ones and there are a lot of great ideas to be stolen from community packs (last GW packs suggests that it has already started). There is also another idea I hope to see implemented within battleplans – better formatting. I would love the game setup, mission special rules and scoring separated somehow so if a player wants a quick refresher about certain aspect of the battleplan reading the whole mission isn’t necessary. One last thing I hope won’t make it to next edition are twists with catch-up mechanics.
Third B: Better implementation of minor/major victory
With current implementation games that are not close(as far as VP are concerned) provide both players with very bad decisions. Winning players must make sure they have enough points to win and then switch to defense or risk their major victory. On the other hand losing player has to decide whether they want to fight for victory and focus on mission objectives or skip the mission completely and go berserk to get minor victory. In my book 20-3 victory should never be a minor victory just as 12-11 victory is not a major one. I’m glad the community adapted the minor/major victory system based on victory margin introduced in mark of chaos battlepack and I would expect Games Workshop to follow, or at least to move away from the current system as “running away after doing just enough” shouldn’t be a winning strategy.
As always thanks for sticking to the end. In 2 weeks you can expect next article as we get closer to the biggest annual Polish tournament – Warkraj2024 and it’s a perfect opportunity for extending “how to overprepare to a tournament” series, especially because it features 6 missions from next iteration of yet unpublished battlepack from popular youtuber 😉
The topic of this article is very wide and touches other extremely deep game aspects like wild dice management, target priority, player/warband playstyle and listbuilding. Because of all this I struggled for few months trying to figure out the exact scope of what I want to cover here. I will try my best to not venture to other topics too much, but because all of the mentioned topics are tightly connected for some of you it might feel like too much (sorry, I tried) or too little (If you would like me to explore some avenues more, comments are the best way to let me know, some ideas for future articles are already growing at the back of my head)
Half of the terms I will use later are instinctively understood by most of the more strategic players and as with all feel-based ideas (strategy is an art, not a science) our definitions will differ slightly so lets start with setting up the definitions that I will use later on. This way I hope to put some structure to the later conversations and avoid any potential misunderstandings. (Difference between “dragon” and “titan” introduced by theSaltySea or terms like activation advantage or action economy made strategy/tactics discussions way easier and this is my intent here).
Types of activations
Lets start in the very beginning. While analyzing the options we have available in the game we can split them into single activations and this activations can be described by both the best moment in turn for certain activation and the impact it has on the game. Based on this two factors we have 2 separate spectrums and to make the conversation and the model we build here easier to grasp lets agree to simply split all activations into 3 categories (with potential for using “very” to indicate that certain aspect is even more extreme). From the timing or “activation urgency” perspective our activations can be described as:
Early (activations with “time window” that can close)
Filler (the timing doesn’t matter or isn’t that critical from strategic point of view)
Late (we want to delay them as much as possible, some actions might only make sense if opponent can’t react to them)
Similarly we can divide our activations based on the impact on the game:
High impact (for example grabbing treasure or killing important target)
Low impact (for example getting into position for future turns)
No impact (for example activating the fighter too slow to impact the game)
Based on the classification above the game round should follow this sequence:
Early, high impact activations
Early, low impact activations
Filler, high impact activations
Filler, low impact activations
Filler, no impact activations
Late, low impact activations
Late, high impact activations
I wont go into much details here, but for obvious (I hope) reasons no impact activation can not be either early or late, because if it has almost no effect on the game then it wouldn’t make sense to delay any of your urgent activations for it or press the trigger earlier on your as-late-as-possible activations. If you have trouble understanding how an activation can be at the same time high impact and also a “filler”, then consider a situation when the urgency came from your opponent having an option to prevent your play (by for example disengaging and running away or preemptively killing your fighter), but instead playing in a way that made your plan unavoidable (for example your intended target was just activated and suddenly there is no way to prevent your attack, which means that you can switch your focus to urgent activations and get back to your original plan later that turn). Example above is also the reason why you would want to make urgent low impact plays before you do your high impact filler plays as the window for urgent plays might close which isn’t the case for filler activations. As always the devil is in the details and there are exceptions to all the “rules” above, but lets assume that this model is true in 95% cases and lets move forward.
Interesting observation coming from the sequence of the round above is that high impact activations happen mostly in the very first activations of the round or as the last things you do. Warbands (often elite heavy) with the center of gravity revolving around early part of the round will often have the word TEMPO used in conversations about strategy, while players with warbands that thrive at the end of the turn (mostly hordes) will often use the term ACTIVATION ADVANTAGE. Lets dive deeper into this concepts.
Tempo
People following Warcry conversations on different social media platforms most likely heard something like “Brewgit buff is a bad tempo play”. It is very easy to instinctively understand why the mentioned play is bad for your tempo as it simply gives your opponent an option to react to incoming high impact play from a buffed fighter. It gives back initiative to your opponent while not impacting the board state which for some players might look like a serious crime. It looks like a very low impact activation that is basically a prerequisite for a very high impact one later on. On the other hand describing what is a good tempo play is way more difficult and as far as the Brewgit example is concerned I would guess that most players will agree that mentioned play is “low tempo”. On the other side of the spectrum we have “high tempo plays” and I expect way less unity here, as tempo is a bit of umbrella term that groups few concepts together, additionally as in life, catastrophes are way easier to identify than successes. Earlier I described urgent activation as one with the time window where it can be performed. Generally as high tempo activations I would consider the combination of your own high impact urgent activations and activations that “close the window” of your opponent most impactful ones. Sometimes opposing players potential most urgent and high impact activations are mutually exclusive (best example is two heavily wounded titans/monsters engaged – the first to activate will most likely eliminate the high impact activation on the other side). Lets agree on the following definition of tempo: Sequencing your activations in a way that decrease the impact of your opponent activations while maximizing the impact of your activations. I would also add that most tempo plays require some significant impact, its difficult to speak about tempo when looking at horde warband with no powerful fighters and abilities. Some examples or high tempo activations are: using net on key fighter, disarming enemy combo before it can harm you or chaining high impact activations with Inspiring Presence. As a last note I want to mention that I would expect tempo plays to exist a bit more in an area of “board state” rather than “scoring”, at least in comparison with activation advantage plays that I describe in the next paragraph.
Activation advantage
As a player that feels the most comfortable playing very numerous warbands “Activation advantage” is the game specific term that I probably use most often. It is sometimes called out-activating or out-waiting your opponent and it basically means that to have activation advantage is to perform last activations of the round. While it might not look like a big deal it gives an option to perform actions that your opponent can’t react to – in treasure mission you can drop the treasure, then pick it up and flee with the other fighter with no option for your opponent to act between both activations. In kill mission you can move to opponent and attack with no fear of retaliation that round and finally (my favorite) in objective missions you can move your last fighters with perfect information to maximize your victory points that round (remember that to prevent your opponent from “stealing” objective you previously controlled you only need to equalize the number of fighters around it). As you probably noticed the mentioned plays require specified fighters to capitalize on the opportunity. Let’s look at the last example – if you are too slow to reach the only objectives you could “last second steal”, then you actually have no way of capitalizing on activation advantage, at least scoring wise, which is obviously bad, that’s why certain class of fighters (like a Dire Wolf that I mention every second article) should appear in horde lists, especially in objective heavy environments like Rumble pack or Scales of War (links to both in Battlepacks tab on top of the page). Similarly moving the treasure between your fighters will work best if you will have a durable or mobile fighter that can step in for your current treasure carrier and making sure you have access to such fighter is something you must consider during list building. It’s not a coincidence that I describe Tempo and Activation advantage next to each other, as often the same fighter that you use to exploit activation advantage with will be in the center of your tempo considerations next round. Example of that would be an Ogor warband with a lot of chaff and a big titan in a form of Gutlord or Tyrant. This warband can have activation advantage early which might be used to activate titan last and surgically position it in a way that will decimate enemy forces next round (you can move into position where you could kill 3 fighters with might makes right double or do anything you want as at this point you operate with perfect information and nothing can escape or react in any way to your activation). The impact of your action will most likely influence your opponent wild dice priorities and if you positioned your titan in a way he can perform few different powerful actions you are not forced to activate it first as you have alternate plans and even if your opponent will remove your plan A you will still have a powerful plan B and C which gives you a chance to perform tempo plays in other map areas while still having a high impact titan activation for later. Using the terms I just described you might say that in the example above one player used activation advantage to position in a way that change the early, high impact activation on the next round into a filler, high impact activation, which improved his tempo next round (there is more urgent stuff he can do before rhis options “expire”). Some of the ways in which you can fight over activation advantage are:
making your opponent activate first in turn (initiative winner choses who goes first and with the same number of activations the player that go second has the last word)
using wait as (first) action, which might double the activations of a fighter
Conservative usage of reactions
Killing unactivated fighters
Local Activation advantage
Obviously the situation where you can activate with no potential counterplay of your opponent doesn’t have to happen after all of his activations are already done. It is sometimes the case that different players have local activation advantage over certain areas. It most often happen with very small difference in numbers of both players activations or as a result of killing unactivated fighters in an area. Always evaluate which fighters can influence which areas of the map. In some situations you can “force” the last unactivated fighter that could impact certain area to activate faster by creating the “timing window” where some harm can be avoided or something could be gained, for example if your Rat Ogor finish activation next to last unactivated enemy fighter in an area, your opponent will most likely activate that fighter to avoid incoming damage from “crack the whip”. Example above would be a “stick”, you are trying to do something that while at first glance looks like a good play (avoiding Rat Ogor damage) might not be in your opponent best interest. This kind of a “mind game” works best against players that value board state over playing the mission, but against some other players you might need a “carrot” and instead of “forcing” your opponent to sequence his activations according to your plans, you might “incentivize” it instead. As in both cases you are giving your opponent something “for free” the key is to always get more in return.
Fighting over local activation advantage might be the only option for elite (low on numbers) warbands to minimize the results of activation advantage of more numerous opponents (in objective missions). If your opponent can simply outwait you and then park his 2 mobile units anywhere on the map to maximize VP gained each round then trying to position in a way that threatens this two mobile fighters if they will come to contested objectives and targeting them as early as possible might open a situation where your opponent can’t translate activation advantage into Victory Points. I think the “matchup” where understanding local activation advantage is the most important is in elite vs elite objective missions.
Player preference and playstyle
Important factor is the personal playstyle of a player. The same list consisting of 2 big titans and 5-7 chaff (its only an example) units can be played in very different ways and one player will start second round of the game with high impact and high tempo play with one of the titans, while the other player in this situation will simply “wait” with one of the chaff units and save the titan activation to the end of the round to make sure it is perfectly positioned to threaten intended targets in the next round. While analyzing our own play/lists when we look for areas for improvements its very easy to overlook the style we have and play in kind of “autopilot” mode, which often makes switching between different list archetypes very difficult. Going back to the terminology from the beginning of this article, playstyle will mostly affect when we will use the “non urgent high impact” activations. The other playstyle related aspect is more connected with list preference. Some players prefer a lot of agency (they usually like to prioritize tempo and overwhelm opponents attacking their options before they could be used) and naturally lists with a lot of power projection, mobility and strength concentrated in single units and abilities will work best for them. I would expect this kind of players to focus more on “playing the board”. Other players (myself included) prefer more “reactive” approach with power budget often spread over the list with fighters and abilities that work best when used at the end of the turn (You messin’ used during last activation is way stronger than used early). This kind of players often focus more on “playing the objective game”. I do believe that both kind of players fall for different traps, so it might be a good idea to try to identify your opponent playstyle. The first kind of player will be more willing to go after the unprotected chaff that is intended to lure key fighters away from important area of the map or into a trap. The second type of player will almost never go for it, but at the same time will be more willing to risk getting extra VP early at the cost of losing the game later. This second approach is way more difficult to “target with mindgames”, but its worth trying.
Listbuilding with sequencing in mind
Certain fighters base their survival on the battlefield on positioning, other on reactions. Similarly some fighters use their offensive tools best when they activate early (like infamous flamehurler that can burn the whole deployment group) others like to attack late (glasscannons that you don’t want to be hit back). Some fighters have this preference change over the course of the game. Let’s look at Otapatl and some of his abilities:
The restriction on his Ambush makes you want to move him first when enemy fighters are not yet spread all over the map, so its often the first activation of the first round. In later rounds when enemies can threaten this lovely chameleon you want to keep an option to use his reaction or at least have option to disengage and run away if something will come dangerously close. Fighters that complement him well are fighters that want to delay first turn activation, are durable so they can “tank” for the lizard and later on produce “early, high impact activations” to keep focus away from Otapatl. Great example of such fighter is a Stormcast Annihilator, that due to very low speed should delay first round movement as long as possible to make the most informed positioning decision you can get, otherwise you might not reach your intended targets. Later on you want to attack with him as early as possible to kill fighters before they can activate and hit him back (despite high Toughness crits sum up to 20 very fast). This concept was one of the reasons I created the Thunderlizards list (Link to full list HERE). Sequencing preference surly isn’t the most important factor when listbuilding, but its a good idea to avoid situations when most of your fighters prefer to operate early/late.
Target priority
Concepts described above should make it easier to predict the intent of your opponent which could be helpful to decided how to attack your opponent plans. But first of all, better understanding on how you plan to win the game will make planning your targets and sequencing your activations easier. When you actively look for local activation advantage (that you can use!) deciding on where to strike is simpler, similarly when you see that there is not much you can do to prevent your opponent’s activation advantage you should target the fighters that can capitalize on this advantage.
Initiative, wild dice and planning ahead
I plan on writing longer article on the topic of wild dice management, so I will try to keep this section short. Some fighters or abilities are so extremally impactful that they change the priorities of previous turns. Some preparation and experience with battleplans make finding such potential plays easier, but if you don’t find them fast enough it might be difficult to catch up. Creating such extreme situation is putting a netter (ideally from a very elite team) in Dagger in Brutal Conquest (Link, its a battleplan from White Dwarf #490). “Correct” response to such situation would be to keep the wild dice in first round. Despite it being the “default” for most players, due to a very “elite heavy” expected lists (I liked playing it with 4 models) it might be tempting to improve potential triple to quad and start smashing, but not keeping the wild dice increase the chance of losing initiative R2 for your opponent and he can’t let that happen as it will lead to netting (lets assume the 3+ will happen) his biggest fighter from Shield, which because of the special rules in this battleplan will result in this fighter dying at the end of the turn (Oversimplyfing this rule: If a player have killed someone then enemy models within 4″ of battlefield edge die at the end of that turn. Netted fighter simply wont be able to move away from the “death zone”).
Try to look for such situations not only to avoid this kind of traps, but also to listbuild around exploiting them (most of them are connected with “deployment camping”, but I would also consider the Seize and Control + Run Interference trap I described in THIS article as other example).
Regarding Initiative – its a great indicator of your opponent priorities. If your opponent wins initiative and makes you do the first activation, it means he values activation advantage over tempo.
Thanks for sticking to the end. I hope the quality of my writing didn’t drop too much as lack of sleep (I just had my first baby born) is taking its toll on me. Usually I stick to “reality” and try to base my writing on analysis, but this time I went a bit into mindgames, so I hope you like that. Have a great day and I hope you won’t get to wait too long for the next text.
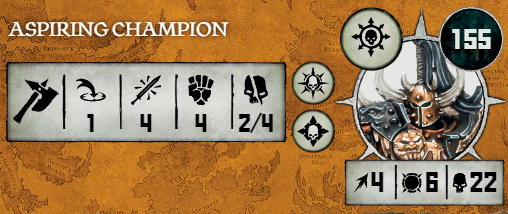
Toughness 6 and over 20 wounds is quite rare outside of Stormcast territory. 4 Attacks with Strength 4 and 2/4 damage isn’t impressive but is good enough to kill chaff (which opens option for rampage on triple) and if needed strength can be increased by the ability value for a cost of a double, which lead to always hitting on 3+ if needed. Impressive defensive capabilities are also boosted by a reaction that can heal 3 wounds before getting attacked. Additionally, this fighter is a Hero, which gives him access to Inspiring Presence which is very important in treasure missions. When planning for treasure missions many players take some treasures “for granted” assuming that some screening and a chaff is all that is needed to secure the treasure that is closest to their deployment area, but Aspiring Champion with great defensive reaction and possibility to pass a treasure when wounded (using Inspiring Presence) will make life very difficult to your opponent. One last thing that this very well-rounded fighter can provide is a potential for very explosive quad turns with Lead the Slaughter. Relying on quads is a bad strategy, but a good warband should have a plan to exploit quads when they finally happen.
Destruction
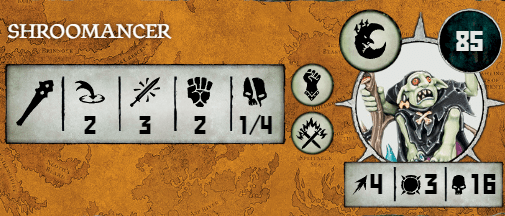
16 Wounds for 85 points isn’t bad on its own but combined with 2” range grants impressive staying power for such low cost, but despite all that the reason why Shroomancer is great is his ability – Fungoid Cloud. Fact that almost every high damage titan in the game has only 3 attacks combined with the way how math works in the game (you add all bonuses first and then subtract) means that if you use triple of fives/sixes on one of mentioned titans then even with onslaught they are still rolling single dice when attacking (if you ignore onslaught you only need a triple of threes, or higher to do this).
Death
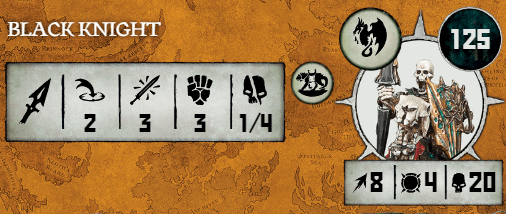
It’s difficult to find bad fighters in SBGL lists, but some good fighters are very rarely seen, overshadowed by even better fighters. Example of this is Zombies being overshadowed by Skeleton Warriors and also – Black Knights, who are seen as less efficient Dire Wolves. As a Dire Wolf lover myself I never field (non FEC) Death warband without at least one Dire Wolf and they clearly have some advantages over Black Knights (reaction, 1 Skeleton cheaper, can climb and open doors), but considering Dire Wolves as more efficient Black Knight is wrong, as while they can serve the same role, there are some tasks that Black Knight will do much better. First difference is of course survivability – with higher Toughness and twice that many wounds Black Knights don’t have to be afraid of everything (85-point Dire Wolf has 61% chance to be oneshotted by 80-point Ardboy that is within 4” and has access to double for charge ability). More defensive profile with similar mobility and the same base size makes it a perfect bodyblocker. Durability on the level of Bespoke leader is sometimes the best a faction can get and here with extremely cheap Skeletons around, Black Knight can be a throw away peace that no other faction could effort. Additionally, it has 2” range – which gives it a possibility to inflict some damage here and there and maybe roll some sixes, where Dire Wolves would not risk attacking opponent’s chaff in objective missions, as the main goal of both of them is to transform activation advantage into points advantage by providing opportunity to increase model count anywhere on the map. Mobile Anvils aren’t popular in the game so some players might not sequence their activations correctly, sadly the influence that this class of fighters have on a game is heavily reliant on both – board density and the type of terrain used, but regardless of this Black Knight deserves way more credit.
Order
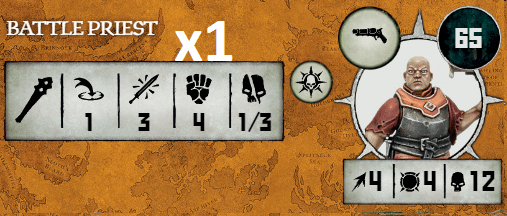
A lot of factions would love to have a 12 wounds, 4 Toughness chaff unit for 65 points. Especially with Strength 4 (less likely to die to counter and more efficient against T3 opposition) and Movement 4 (most efficient fighters are expected to have move 3. I’m not saying that Battle Priest is a paragon of efficiency, rather that Move 4 is a nice thing to have, as it will make it easier to traverse the battlefield). Now thanks to CoS update Order finally gain access to such fighter, that unfortunately isn’t spammable due to Hero runemark. A lot of conversations about SCE Warrior chamber Paladins not having the bodycount to properly function as a warband are now gone, as thanks to Battle Priest you can comfortably get to 7 bodies without compromises that were necessary before (example list: 1x “Mighty” Judicator-Prime with Boltstorm Crossbow, 2x Battle Priest, 4x Paladin with Starsoul Mace). Making strong and efficient fighters even stronger isn’t the only usage of Battle Priests. They can be used in factions that are in dire need of a better/cheaper chaff – like IDK (sadly in this case both chaff and Akhelian Kings compete for the same hero “slots”), Blacktalons (no chaff at all) or Vulkun Flameseekers (cheapest unit costs 95 points). Option to change a Witch Elf into 1,5x more durable fighter for the same cost is also quite tempting. Lastly – as a hero Battle Priest provides access to Inspiring Presence and having option to grab 2 treasures before your opponent can make his first activation is a great way to start a game with a lead.
As always thanks for reading. What is your pick for most underrated fighter? Is it Drothblood Thane, Beast of Nurgle or something completely different, let me know in the comments (here or on a platform where you saw the article).
Treasure missions are in essence few simultaneous races with player winning most of the races winning the game. Every treasure is a separate race where both players are racing to pick it up first, then in case opponent has it, engage the treasure carrier before it escapes and then either kill the treasure carrier to steal it or try to escape danger with your treasures. Naturally in a race moving before your opponent is a great advantage and that’s why in this type of mission both Initiative and Inspiring Presence universal ability will have way higher impact than in for example objective based battleplan. Tactics listed below will help you get ahead in certain steps of this race. To organize my thoughts better I will split this tactics into 3 categories: Inspiring Presence tactics, ability based tactics (that by nature will be faction specific) and non-ability based tactics that will be quite universal.
Some of the tactics below might not work in every battleplan or work even better in others as since GW introduced Loot and Pillage (great mission from Rumble Pack) some battleplans have core rules altered with either requirement to spend actions to pick up or “loot” the treasure or additional rule preventing fighters from spending action to drop the treasure, so as always keep the mission in mind while analyzing anything game related.
Inspiring Presence tactics
“2 for 1” – The most obvious and one of the strongest plays you can do (especially after winning initiative in a game with even number of objectives) is activating 2 fighters that will pick up objectives in a row. When done as first activation it might force opponent to also use inspiring presence to net get behind with the numbers of objectives in control. Always keep this play in mind and try to prevent your opponent from doing this by strategically deciding which treasures you will pick up (for example your opponent might only do “2 for 1” from one deployment group and you can mess this up by reaching one of 2 objectives that are in range of mentioned deployment group). This shouldn’t be the main factor when deciding which treasures you go for, but keeping this in mind will lead to more early advantages in treasure battleplans. Obviously instead of picking up treasures you can use any other tactics instead and thanks to Inspiring Presence do them in sequence when you benefit from it greatly.
Poor man’s bonus action steal – Sometimes (especially when facing hordes) killing a treasure carrier in first action can’t be followed by picking up treasure because activated fighter is still engaged, in such situations if activated fighter is a hero you can use Inspiring Presence to pick that treasure with another fighter.
Pass the treasure – If the treasure is carried by a hero you can use Inspiring Presence and spend an action to drop the treasure, just to pick it up in the next activation of your another fighter. This play alone makes single treasure missions very frustrating (killing most of Fomo Crusher just to have the only treasure passed to Varanguard is pure NPE).
Ability based tactics
Disengage with treasure – If your treasure carrier has access to bonus move or disengage action (example factions: Seraphon, Skaven and SBGL) it can spend action to drop the treasure and then disengage “over” that treasure for around 2″ and move again picking up the treasure using ability to perform one of this last 2 actions. When done by a fast fighter (like for example a Stormvermin) you can avoid being hit by slower fighters (for as long as you have initiative), as they will require both actions just to catch up again.
Bonus action steal – In a situation described in “poor man’s bonus action steal”, having to spend one action on killing the treasure carrier might not be enough to then pick it up in the next action and this is where one extra action required to do it might be “outsourced” to an ability. To make it work you must have access to either bonus move, attack, disengage or damage based ability (that will work as replacement for attack action). A lot of factions could do it, for example Ironjawz, thanks to their Charge, OBR because of bonus move on Stalkers and Morghasts or SCE: Warrior Chamber thanks to their bonus attack on double. A lot of heroes also can get a bonus action after a kill, so almost every faction in the game can perform this.
Cheap pass the treasure/”2 for 1″ – Some factions or Underworlds warbands (like for example Grinkrak’s Looncourt or Claws of Karanak) have access to Inspiring Presence like ability on a double. Keep advantage of it as Inspiring Presence tactics are one of the best tools you have in treasure missions.
Teleport the treasure – The most obvious tactic with the title saying everything there is to say. Teleporting the treasure away from danger is never a bad play. Always keep teleport abilities in mind. Not many factions can do it, Sylvaneth and Nighthaunt are the most popular ones utilizing this “trick”.
Net the threat – Keeping your treasures safe is one of the most important objectives of a good plan. Immobilizing the biggest threat for your treasures or preventing the fighter you can’t kill from picking up the treasure might be a game winning play. Net abilities are very strong and treasure missions are not an exception here. Beware the high percentage ones from Daughters of Khaine or Kruleboyz and the guaranteed one from Splintered Fang.
Non-ability based tactics
Double Engage – I already mentioned twice that having a threat for a treasure carrier engaged with additional fighter require using abilities to steal that treasure in single activation, so whenever possible double or even triple engage threats for your treasures and approach opposing treasures in a way that let’s you avoid such trap. The reaction that all Chaos and Death Thralls have is a great way of forcing double engage during your opponent activation, making it almost unavoidable.
Treasure Gambit – Sometimes the treasure carrier is too slow to escape the big guy chasing it and in such situations it might be better to “sacrifice” a chaff fighter and move it directly into the big threat with the intention of postponing the moment when it can finally reach/attack your treasure (work best on fighters without bonus actions on kill). This tactic can punish big fighters with 2″ and 3″ reach attacks that do not position within 1″ of their intended target, as you always must target fighters within 1″ before you can aim at more distant targets. To not have it done against you – always position your big guys within 1″ of their target, otherwise you might be forced to waste some attacks on unintended targets.
Encirclement – To make already mentioned “double engage” harder for your opponent try to position your fighters approaching the same target in a way that will force your opponent to use as much fighters as possible to “double engage” all of your fighters. Keeping a lot of space between your offensive fighters is a good rule of thumb in treasure missions.
Activation advantage pass – If you can activate twice after your opponent is done with all activations around one of your treasures (local activation advantage) you can simply drop the treasure in first activation and pick it up with other fighter in second activation. Making sure you circle you treasures from your heavily wounded fighters to healthy ones is very important when playing horde warbands. Keeping control over treasures is more important than saving some ability dice, so waiting for the end of the turn with the treasure passing might not be the best plan for every situation.
Wild dice usage around inspiring presence in first round – Sometimes when your opponent is starting with a triple it might be better idea to spend the wild dice on initiative, instead of trying to match his Inspiring Presence, as grabbing one of objectives first might disarm the “2 for 1” attempt of your opponent. Even if you can’t do that, sometimes the situation around who has advantage over which objective is quite clear and improving your odds in area where you are evenly matched might be better than charging into 2 lost fights instead.
Tactical action drop – In some cases rolling unexpectedly well might be more problematic for you, than your opponent. If you double engage opposing treasure and want to weaken the treasure carrier with one fighter expecting the second fighter to finish the job and pick up the treasure. If first fighter unexpectedly roll few sixes in first attack action it might be better idea to finish activation with wait instead of risking killing that fighter in second action, which can result in your opponent picking up this treasure again with a fresh and healthy model. Of course its only the case when the first of your fighters lacks tools to pick up the treasure after killing treasure carrier in his second action.
As always thanks for sticking to the end. I hope this will bring some value even for more experienced players. If I missed some interesting tactic let me know.
As first post appeared in the middle of January its a great moment to discuss the current state and future direction of this blog. I have a lot in mind writing this and to not end up with complete mess I need to structure my thoughts a bit. I will split it into 3 parts: history of the blog, my Warcry related personal experiences this year and finally, plans for 2024.
Blog history
The blog was born for 2 main reasons. As I was already spending way too much time thinking about the game, analyzing and listbrewing (as a person, when I really like something I will overthink it a lot and have my mind process “in the background” topics related to my current “obsession”, while doing other stuff. For example, Thunderlizards list was created when I was shopping with my wife) I decided to try and dedicated all that “wasted” energy into creating something valuable and write some of my thoughts. Second reason was simply my disappointment in how shallow the online discourse was. I was naive to think that detailed analysis or more complex ideas will provoke some interesting conversations, but I failed to get any responses that actually challenged my ideas and online discourse while a bit better now (mostly due to theSaltySea introducing terms like “activation advantage” to the masses) is still quite bad. I will keep trying, but my hopes are way lower than a year ago (I am working on big text about activation advantage and sequencing that I hope can generate some conversations).
Obviously over a year of working on OverthinkingWarcry.com a lot of my initial ideas evolved. I want to thank Dan from theSaltySea here as the whole “Netlists” part of the blog was inspired by the idea he wrote on Discord, that for the article based blog to survive and get any following some additional utility has to be implemented that will make people revisit the page. He also threatened that if no one will create a compilation of netlists he will do it himself, so here I am a year later with 25 Netlists, each containing mini-guide on how to use it. As I already mentioned a number lets go to the numbers. Until now the blog was visited 29160 times by 10202 visitors (opening different articles counts as separate views, so the actual number is lower as it also includes visiting navigation pages like “All Lists” or “All Articles”, which are 2 most often visited pages). As I already mentioned the number of Netlist mini-guides I feel I should also mention that this is the 24th Article.
Removing navigation pages from the equation 3 most popular articles were:
The WordPress yearly stats nicely show how the views and visitors were changing over the year (with views per visit staying quite consistently around 3)
The blog slowed down after the May spike as the articles following the 2 big hits (first and third most popular texts this year) failed to generate similar reaction. I learned from this that the more attractive for beginners my topic was the more traction it received (this seems obvious, but this kind of observations are always obvious from hindsight). As my main focus was the competitive part of the hobby I had a big dilemma there – do I go for the popular topics to maximize views, or do I go more hardcore path that won’t be as attractive for casual players (that heavily outnumber us “tryhards”). I decided to go with more tournament oriented route, but decided to build some bridges (for example the Dictionary article, that I hoped will be very popular and often presented to new players by people from the community, sadly it wasn’t) for less experienced players that wanted to follow. I also didn’t want to go the “easy” route and simply react to new releases and news. Currently I’m happy with how the blog function and since some time my posting schedule averages to 2 articles per month. I hope I will be able to keep releasing articles at similar pace next year, but I expect my first baby at the end of January so it might be difficult. More on the future in last part of the article.
Lastly I’m happy that some things from this blog impacted a community a bit. I’m very happy that Thunderlizards list became quite popular and my battlepack was used in few tournaments (including 2 editions of TTS league, greetings to TTS folks) and some aspects of it influenced work of other people (like for example the minor/major victory change). Lastly I heard few times that I changed the listbuilding approach to quads for some people and changed or inspired few people in some other ways – thanks for this kind of comments as reading them is the most fun part about this whole Overthinking Warcry project.
What was this year for me (game wise)
This year I played a great variety of different warbands. The most numerous was 14 fighters Gitz spam, the most elite warband was only 4 fighters (Destruction “greatest hits” – Tyrant, Gnashtoof, Megaboss and Torka for the 2+ net). I played 11 factions in total this year: SCE Thunderstrike, CoS (pre change), Daughters of Khaine, Tzeentch daemons, Soulblight Gravelords, Ossiarch Bonereapers, Flesh-Eater Courts, Nighthaunt, Gloomspite Gitz, Ironjawz and Kruleboyz. The power level of my lists varied even more than the factions I played, as I played both Wanderer based CoS list and filthy Grave Guard spam. As far as my competitive results are concerned I played 6 tournaments:
In January I finished 7th (2-1-1) with my SBGL in 16 player tournament. Tournament prep and battle reports from all my games are available as articles. It was the biggest tournament we had in our city, few players traveled 350km (220 miles for imperial folks) to this event and one of them defeated me. This is what happen when you bring a knife to a gun fight – I didn’t have a monster and 4 out of top 6 places had monsters in list, including both Zombie Dragons I met and lost/drawed against.
In March it was me who traveled 350km to the biggest tournament in Poland (it was planned for 32 seats but sadly only 25 players showed up, but it was stacked, as there were representatives of 7 bigger cities, from our local community we also sent quite a strong team as whole top3 from our tournament that happened last month was there, one of us took first – congrats Tomek). My SBGL finished 14th with a disappointing 2-2-0 score, my prep is also available as article HERE.
For the next tournament in April I ditched SBGL for Ironjawz and finished 1st with 3-0-0 score in 14 player tournament. Short tournament summary HERE.
As I already had top 2 finishes with both Destruction and Death (2nd place with SBGL late 2022) for June I decided to switch to Order and used my freshly created Thunderlizards (HERE is an article with list creation) and finished 2nd with 3-1-0 score.
In September our TO decided to give “Test of Champions” a chance and we used battleplans from White Dwarf. I played SCE Thunderstrike (list creation HERE) and finished second with 2-0-1 score.
In December for the last tournament of the year I decided to move back to SBGL. It was a small local tournament but as we used Mark of Chaos battlepack designed here on this blog it was special to me. I finished 2nd again with 2-1-0 score. My prep is available HERE and the design process of the battlepack is HERE.
Overall this year my combined tournament score is 14-5-2 with 3 different grand alliances, which is not bad considering that for a second year in a row in our local community there is only single player that I lost to (my combined score against this guy is currently 2-3 across different tournaments, good job Andrzej).
Moving to less hardcore gaming, my biggest “casual” achievements is definitively having positive win rate with DoK and Tzeentch deamons. The craziest Warcry experience I had this year was definitly a casual game I had in first half of the year. I played Gitz and my list was basically Stabba with spear spam, single bounder and a Loonboss (for his quad, see picture below) and played against Seraphon mix of Saurus and skinks with Slann supported by Company Captain.
This game I had 2 quads of sixes that I spent on +6 attack bubble in the first 3 turns. I rolled a ton of dices (I had 13 bodies so there were a lot of fighters in 6″ range) that resulted in … 2 kills … in total, for the whole 3 rounds. As it was a treasure mission not everything was lost, but starting last turn it was looking quite grim for me and … I rolled a quad of sixes again (this time Loonbos was already dead and I had only 3 fighters left). My opponent started and killed on of my guys (now 2 left) and it was time to give another Gitz specific quad a go (see below).
I did the measurements, calculations and the only play that could give me a draw (it was 3-1 in treasures at this point and one of my 2 remaining gitz was relatively safe boingrot bounder with his treasure) was a double move towards unharmed company captain (16 wounds), rolling 2 crits on 2 dice and then picking up treasure and surviving to the end of the round. I obviously managed to roll this 2 sixes and I never was more happy from a draw. The whole game I killed 3 fighters, lost 11 and ended up with a draw.
Plans for the future of Overthinking Warcry
I will start with the simplest plans – articles that are currently in various stages of development, so you can expect topics listed below to appear sooner than later:
Tactics for treasure missions (had half of it ready and deleted it :/)
Randomness in battleplan generation in competitive environment
Slaves to Darkness miniguide in Netlists (allied Fomo and Myrmidon)
One box collection extension: Ogors
Lessons learned for designing a battlepack and release of next one
Huge text on Sequencing and activation advantage
I would love to keep the average of one article every 2 weeks for the next year, but due to my first baby arriving in January the beginning of the year might be rough.
I would love to extend the type of content I do and seriously attack the topic of battle reports with heavy emphasis on planning and strategy. I will have to switch to a better phone next as my current one makes very bad photos.
I think I should try to implement AI tools into my writing to improve my language. I am aware that my “style” isn’t the easiest to read especially due to very long sentences I tend to write and over usage of both brackets and quotes, not mentioning the incorrect space that I put on purpose before every bracket.
Lastly – I will start Patreon, but I don’t expect it to do extremely well as I promise that none of my content or help will ever be behind a paywall (if you want to consult your list with me just write directly to me on Discord as few people already did and I will try to offer some feedback. I’m very glad that some of the players that already did this managed to win tournaments with the lists I was helping with and some even won a tournament with the list where they ignored my advice)
I would also want to finish my “Beginners corner”. My initial idea was to have 3 articles for people that want to start playing Warcry, 3 articles for people that already started but are very new to the game and 3 articles for people that want to prepare to their first tournament.
Let’s hope that I won’t fail at all of this goals and that most of my articles will end up being decent. As always thanks for sticking to the end and happy new year.
Despite the fact that Warcry isn’t the most complicated game (rules-wise), there is a lot of depth in it and great players have countless avenues to express their skill. Below I will show you 3 different things that will let you increase the speed of your growth. Despite quite limited (in comparison to games like Warcry’s bigger brother – Age of Sigmar) amount of information to keep track players often forgot/misinterpret important elements of the game, like battleplan details, reactions, abilities or details of fighter profiles. Making sure both you and your opponent have easier job tracking all important information will lead to a higher quality games and also to faster growth of both players, as you will avoid “bad practice” games decided by players forgetting about important stuff and with easy access to required information you can dedicated more brainpower to the game. The same will apply to your opponent and the better your opposition during trening, the better you are. TLDR = when you improve how you “store” information required for the game you decrease “mental load” and you can spend this freed resources on your tactics improving the quality of gameplay both for you and your sparing partner.
1. Try to prepare one sheet roster with all profiles and abilities of your warband
The title says it all, when you have all required information properly formatted you will always have all your profiles and abilities in front of you during games. Make sure to remove “dead” abilities, like for example bladeborn fighter abilities affecting only other fighters from the same Underworlds team, in a warbands where you don’t include this other fighters (you can see me skipping such abilities in my SBGL example below). The other way to make your warband sheet better would be to try (if possible) to keep fighter abilities next to the fighters that could actually use it. Below you can see example of warband sheet I prepared for the last tournament I played (I finished second, link to the file if you want to try the list yourself HERE):
If you are interested in other example of this, HERE is the Ironjawz list sheet I tested for the same tournament (and HERE is the article about that list creation) or more casual but way more challenging formatting wise Tzeentch casual list I played lately HERE.
If you don’t know how to create something like that, then I suggest starting with a table in a MS Word or Google Docs where you can copy profiles and abilities from Warcrier.net (highly recommend using this site) and moving from there.
With all your profiles and abilities in front of you it will be way more difficult to forget that your warband has access to some rarely used ability (like Calthia lantern that can suddenly be very helpful when opposing Horns of Hashut have access to triple of fives and triple of sixes)
You can also remove “bad abilities” (maybe consult it with some experienced players if you are a beginner) like most of the quads to remove the distraction of analyzing if they fit the situation.
2. Make sure all other information is also easily available for both players
Try to “outsource” keeping track of anything to convenient tools, for example lay down your phone next to the game board with app showing the points of both players (I use random app for keeping track of player life in MTG), so its clear for both players at all times, similarly keep a die with turn number next to your phone, it can make calculating the points from “scaling objectives” easier. Most importantly – make sure measurements you do in game are made in a way that is clear to your opponent, so he won’t have to do all of them in his turns. Making sure all information is clear and conveniently stored for your opponent is why you should ALWAYS have a copy of your roster for your opponent. If you want to take a single thing from this article and you are not already doing this, then a copy of your roster for your opponent is the thing to implement if you had to chose only one. Keeping things clear for both players also connects to measurements – when you deploy fighters barely outside of maximum threat range of enemy fighter than mention it (together with saying the distance) to your opponent, to limit the amount of things he has to consider and measure. Remember that the better your opponent the more valuable he is as your practice opponent, so to get better faster, help your friends get better too.
One last note on the topic – painted minis provide better clarity, so there is no excuse not to paint your minis. There is nothing worse than winning because your opponent can’t differentiate your threats from your chaff.
3. Don’t be afraid to format the rules and battleplan text to better fill your needs.
In one of examples I listed in 1st point there is a Tzeentch warband sheet. Some of the abilities might have a “dead text”, like for example reference to injury rolls in campaign games that is mentioned in Horrors reactions – delete this text if you are not playing narrative. The whole idea behind this article is that you should trim the fat from all information and improve the formatting and ovarall access to it, which sometimes leads to formatting or editing Games Workshop text. The most important place where you should do it is in description of battleplans. Let’s take a look at popular Rumble Pack battleplan:
There are 3 different rules in a single paragraph and you can’t quickly reference them as they are inside a small “wall of text”, additionally Sidequest is on another page. Let’s quickly compare it with the draft of next version of by battlepack:
Similar amount of information is formatted in a way that makes referencing specific rule way easier. I also underlined all references to when specific rule gets “triggered”, but you can go even further and highlight other stuff, like for example the distances or places where one rule ends and the next one begins or anything else you find valuable and makes checking it easier and faster.
As always thanks for sticking to the end, merry christmas and I hope Santa knows which factions you play 😉
In the beginning of 2nd edition 7 Vindictors list became very popular. A lot of people were saying that it is a great way to start playing Warcry and this opinion was repeated even more often after this list won a tournament. Discord and Reddit were full of people praising the list and its effectiveness against monsters. Few months later, with Core Book battleplans getting less popular and monsters in decline after the nerf this list popularity dropped. It’s still arguably the build that most people encountered this edition and the “classic” status is certainly deserved. Now the golden era of spear equipped Stormcasts is over and they are definitely overshadowed by annihilators as the default Thunderstrike Chamber unit. Let’s review the “oldie but goodie” and try to slightly improve it while at the same time trying not to change it too much – we don’t want the changed “Oops all vindictors” list to end up with not enough vindictors.
Let’s identify the list weaknesses and try to find possible solutions. One of the problems I had while playing vindictor based lists was always lack of impactful abilities, so we definitely need the added fighters to bring some exciting and impactful abilities. The other problem is that with no powerful rampager in the original list, it can’t change the direction of the game when rolling a quad. The big threat that would use rampage well isn’t necessary so we can look for fighters that will bring other impactful quads with them. For me 7 bodies is an extremely low number, but for a lot of people it isn’t the case and I feel that changing the number of fighters might lead us too far away from original idea, so let’s keep that number. Let’s move to the original idea and see which other direction we can move from there.
I would say that the key element of the list was that it was extremely cheap and easy to build, as it required only a single box of vindictors or using part of hugely popular Dominion box. Let’s start in similar place – Warrior starter, a smaller sister of huge Dominion box, was also extremely popular, but included only 5 vindictors. Let’s start here – our list will “only” have 5 vindictors so people that bought this box have enough vindictors to play the list we are crafting.
Core of the list:
The Warrior starter included alternative hero that could lead our forces – Knight-Arcanum.
This fighter is perfect for the list as it not only gives us completely new tool in ranged attack (that is terrifying to enemy chaff), that works extremely well with 2” range of vindictors, (moving to attack enemy fighters is not excluding the option to later shoot at it), but it also has a great double that we will most likely will use every time we have a double of threes, fours, fives or sixes – Bolt from the Heavens.
With Knight-Arcanum in the list we are left with only 120 points left. As we already identified the “magic missile” attack as a great addition, let’s not look further and simply take one of the only two 120 points mages with this attack profile that order has access to: CoS Battlemage (that can be easily proxied) or Scinari Calligrave from Lumineth Realmlords and our list looks like that:
Knight-Arcanum
Scinari Calligrave / Battlemage
5x Vindictor
I think the list above is already way more fun to play than the original, but it still has problems with access to impactful abilities and lack of good plan for a “quad turn”. We can stop here, but 5 points list adjustment can fix both problems and increase the power of the list immensely. All we have to do is “demote” single Vindictor into Annihilator with shield. This change will immidietly fix the “quad problem” as annihilators have access to incredible quad – Force of a Falling Star.
5 points gained this way can be used to improve our mage in 2 ways. The first path is the most popular Underworlds ally – Kixi-Taka.
Picking this skink priest gives the warband access to a very nice triple – Imbue with Azyrite Energy, as well as his faction double that in case of a kill gives him bonus move or attack action. Against T3 opponents this ability might lead to a lot of deaths among enemy chaff and together with ranged attacks of Knight-Arcanum can lead to quite impressive ranged damage.
The other path if you don’t like Seraphon estethic, are simply tired of seeing Kixi-Taka in every second list or don’t want any fighters that wield pokeballs is the Sorceress from CoS: Darkling Covens.
She has worse melee attack, speed, reaction and abilities, but is similar enough to serve the same role. The only advantage over Kixi-Taka is her quad, Vitrolic Spray that can nuke enemies when used with high ability value
The Final version of the list:
Knight-Arcanum
Kixi-Taka / Sorceress
4x Vindictor
Annihilator with shield
My main problem with original 7 vindictors list is that it is very bad for beginners (#unpopular opinion, I know). Lack of distinct fighters that serve different roles depending on battlepack, opposing warband and the gamestate makes learning the game more difficult in my opinion. I believe beginner friendly list should help players learn game fundamentals and its different aspects and not rely on strong fundamentals to work. Lack of impactful abilities and combos also make running the original list less fun for “Timmy” and some “Johny” players as your fighters are quite OK and don’t have any big flaws, but at the same time don’t excel at anything and without rolling few sixes there isn’t much excitement or explosiveness in their gameplay. I hope the changes I proposed will make you reconsider going back to vindictor based lists, at least in more casual setting, where there is less space for powerful fighters like annihilators.
As always, thanks for reading and have a great day.
If the title seemed familiar then you might remember 2 older articles about tournament (over)preparation I wrote in the beginning of the year. In January I wrote How to overprepare for tournament, which was the first article published on this blog. It was followed by How to overprepare for … slightly modified Rumble Pack tournament (32 places), which was a third article here. This one will be 22nd article not counting netlists and I think its proper to end this year just as I started it (I expect more articles this year, but most probably it will be my last tournament in 2023), at least when it comes to tournament related articles on my blog. Let’s not get too sentimental and move straight to the topic.
The tournament
The first Sunday of December our local TO is organizing 3 round tournament that is planned for around 12 seats (it can be a bit more or a bit less). As you can see it won’t be the biggest or most impressive event, but for me it will be special as we will use the battlepack I created – Mark of Chaos.
Restrictions
As this article is basically my attempt of finding the list that suits the expected tournament meta and works best in the chosen battlepack I will start with the factors that limit my creativity.
Firstly as I don’t own any “serious” chaos faction (outside of my wife’s limited collection of Skaven), so I won’t consider any chaos faction.
Secondly as my order collection is quite limited I will only consider Stormcast subfactions out of this grand alliance (I didn’t manage to paint CoS Dispossessed on time).
As for my favorite grand alliances – Death and Destruction, with some proxies I can basically field almost any roster here, so expect most of my exploration to happen within this grand alliances.
Lastly divine blessings are not allowed, so hopefully I might dive a little less deep than I would have to otherwise.
Battlepack
The most important factor in list building are always the missions the list will play as basically battleplans create the challenges that you will try to overcome better than your opponent. One of my main goals when creating the battlepack (HERE is an article about battlepack creation if you are interested, the most unique element about the pack that needs to be mentioned here is that there is separation between deployment maps and victory conditions, so every victory condition can be played on every map) was making list optimization as tough as possible. Today after playtesting the pack for a while and receiving some feedback I see areas where I didn’t do the best job and this is the time to test if all the potential holes in my balancing attempts are real. Let’s start with Deployment Maps.
My main attempt with maps was to have balanced deployment groups and not have the “obvious places” where you put your single best killer, treasure grabber or other specialized unit or combo element. With deployment maps being randomly drawed separately from Victory Conditions (and number of potential treasures) I made sure that as far as hunting treasures goes, its quite difficult to efficiently split your forces with single fighter dedicated to treasure hunting, so my conclusion here is – every deployment group needs fighters that are fast enough (potentially with abilities) to steal some treasures if opponent would drop the ball. Sadly on the balance of deployment groups front it is I who dropped the ball and Shield is usually starting more distant from the center of the battlefield than other groups, so the key fighters and more numbers will end up in other deployment groups.
My other observation that came from analyzing deployment maps is that on the maps where numbers advantage is the most important – the ones with the most (potential) objectives it is Hammer that always starts in the best area to reach multiple objectives, so definitely the most numbers will go there. As some of the objectives are quite distant from Hammer the movement buffing ability should also end up in that deployment group.
Lastly I have to move to the future a bit and mention one of Victory Conditions that must be also considered in the context of deployment maps. In Victory Condition “Proving Grounds” to score any points in 1st round the fighter must deal damage with attack action and the long distances between opposing players deployment areas require considering fighters that can possibly help secure early Victory Points. This kind of power projection require very fast fighters, shooting or some impressive movement abilities. Let’s consider next key element of battlepack – Victory Conditions.
Victory Conditions
Before I start diving into victory conditions there is one very important observation I need to share. I think it might be the single most important factor in deciding which warband to choose and it’s a relation between number of rounds and expected number of people. As we expect over 8 players (2^number of rounds) it means that there might be 2 players with 3-0 score. This is a very important detail as it means that simply winning all games might not be enough to finish first and the target in game will be to not only win, but to aim at major victory. This situation leads to a requirement for a list to be able to get ahead as soon as possible as later on there might not be enough time to gain enough lead. I will return to that point with few of the victory conditions, but let’s quickly go through them.
Last Stand is a quite standard objective mission with a secondary scoring for killing on objective. To win a major victory on a map with 5 objectives would require 6 VP advantage which is a lot, especially as extending forces to reach more objectives might result in kill points for the enemy instead. I do believe that it is a well balanced mission where every archetype have a clear way to win the game and depending on the number of objectives (3-5) the value of kill points is changing. Despite the fact that I believe it to be a quite balanced mission I feel that hordes have an advantage here as heavily wounded chaff units can be “evacuated” and still bring some value from areas that are over 3” away from objectives and also the pressure to be proactive is on the less numerous warband.
Growing Power is a second objective mission. This one doesn’t have a secondary scoring, but the value of controlling objectives is raising over time. I do believe that getting Major Victory in this mission is the easiest out of all others as simply “winning” round four can almost grant enough victory points to turn a very close game into a major victory. They key here is to be able to gain or protect numbers advantage to control more objectives last round.
Godbeast Fangs (one of many forms of Amberbone – Realmstone from Ghur) is a reskin of famous Loot and Pillage. You need to loot objectives for treasure, that you later cannot drop as an action (at least not with the fighter that looted it). To gain major victory you need more than 1 treasure advantage and it looks like very difficult task, at least against experienced opponent. Aiming at major victory require winning fights over multiple treasures, which require a lot of damage from the list and big distance to treasures in some maps require mobility to engage treasure bearers preventing them from hiding with treasure behind enemy lines.
Amberbone Rush is quite unique treasure mission where holding treasures is scored every round. It makes reaching distant treasures even more important. Additionally killing treasure bearers is also worth points so it might be a good idea to not pick up treasure with your chaff if it can be instantly cleared and lose the treasure leading to a “free” VP for the opponent. Major victory require keeping treasure advantage for most of the game with some “killpoints” on top.
So far the missions doesn’t require any unusual list adjustments. Some speed, numbers advantage and a lot of damage is something that is needed in every situation. Last two missions however are a bit more “demanding”. With Proving Grounds we want to start scoring in first round and with quite significant distance between battlegroups in most of deployment maps the list must be able to contest winning round 1 as otherwise a shooty/fast opponent can get the lead that will require serious offering to dice gods to get even a minor victory. As I mostly play slow and non-shooting warbands this is the big challenge. Single point of damage in first round can be the difference between a draw and a win or a major and minor victory. This mission also require having more threats and heavily promote both nets and brewgits.
Final Act similarly to previous mission benefits from more “decentralized damage budget”, as with planty of fighters that can deal damage there isn’t much lost when one of them switches to full defense mode and you can’t lose a ton of points when your biggest threat overextends and dies. Trying to avoid easy 2+ points targets is very important listbuilding consideration.
Listbuilding
Summarizing everything that was mentioned above – the list is required to have numbers, a lot of damage potential and have ability to start damaging opponents in first round on every deployment map. I expect a diverse meta with both elite lists (including 5 body monster list and some Stormcasts) and hordes (I expect 13 body skeleton spam from one of the players) with a bit more hordes. After thinking on that a lot and some playtesting I discarded Order warbands as Stormcasts lack both numbers and speed necessary to fight for major victories. With 4 rounds they would definitely be in the picture, but as I mentioned – I’m trying to avoid 2nd place with 3-0 record (I finished 2nd in 2 out of 3 last tournaments and don’t want to it to became a tradition. I hope it won’t look like arrogance and more like declaring a clear goal). It leaves me with my favorites: Death and Destruction.
Destruction
As killing is quite important in this battlepack the obvious solution would be to use the best killers in the game – Ogre heroes. With how Proving Grounds work Brewgit is a must have addition. For chaff selection Gitz are simply bad and Gnoblars die too easily. From remaining choices Ardboyz look best and have You messin’ in faction that could help deal with opponent numbers advantage. Most of the Ironjawz listbuilding was covered in separate article – Lisbuilding session: Ironjawz. The list that I was considering and playtesting for the tournament:
Brute Boss
Crusher
Brute with Gore Choppa
4x Ardboy
Brewgit
I decided on the variant with Crusher instead of Gutlord as I expect his job to be mostly trying to clear 2 chaff per turn and Crusher is better at it than Gutlord.
Death
I believe the choice I have here is between OBR and SBGL. For battlepack closer to Rumble Pack and way more horde oriented meta the choice is very difficult, but due to some elite lists I expect and the shape of the kill missions I don’t think OBR are on the same level as the less sandy skeletons.
With a lot of victory points coming from killing I think Grave Guards spam will work better than Skeleton spam. I refuse to play undead hordes without at least one Dire Wolf so he is definitely in. As far as heroes are concerned there are 3 ways: as cheap as possible (Wight King/King Morlak/Sepulchar Warden), “Mid range”(Vampire Lord/Prince Duvalle/Deintalos) and 260/270 points highly mobile ones (all 3 heroes at this cost are fine IMO, but the most expensive is my favorite). I really believe that with extreme cost effectiveness of Grave Guards spending more than absolutely necessary on Heroes is often a bad idea and last tournament I played SBGL I had a lot of problems with high Toughness opponents, so Deintalos will be my choice. This leader also helps with the big problem of SBGL (it’s only a big flaw when compering this faction to the higher tiers of competition) – lack of gamechanging quads (no good rampagers) with access to Vanhel’s Dance Macabre. After diving a bit into distances to objectives I decided that my Grave Guards will need “Waaagh-like” movement buff to properly dominate on 5 objective/treasure maps, so Crypt Ghast joined the team. As far as adjusting SBGL list with few last points there is infinite number of ways and I decided that simply squeezing 2 skeleton warriors with spear there so I have more bodies, fighters that can use wait action with almost no drop in warband performance and finally – add some 2″ range so I can use it to better influence situation on objectives from outside of area where killing them would grant my opponent some VP in Last Stand. I was very happy with the list, except for Crypt Ghast being big vulnerability in Final Act, but I’m sure he is well worth it. The final list that emerged from my playtesting (I gave Crimson Court a chance, but they didn’t perform as well as I expected and I ended up prioritizing Shambling Horde over their great double):
Deintalos
Crypt Ghast
Dire Wolf
8x Grave Guard with Great Wight Blade
2x Skeleton Warrior with Spear
Ultimately the decision on which list I will play was way easier than I expected. I saw a lot of netters during pre-tournament playtesting in our community and I think one big threat list like the destruction one is basically begging to get netted. I also encountered more hordes than I expected (our local community was very elite heavy earlier this year).
Deployment Groups
I really don’t like the way most of the lists are presented by content creators (exactly like I presented it above), as usually less experienced players even knowing the full list have problems splitting it into deployment groups, so let’s quickly fix my mistake. To split force into Dagger, Hammer and Shield we need to go back to deployment maps. I already mentioned that Shield is in worse position than other deployment groups so it definitely will receive less power than other two groups. I mentioned earlier that having some mobility in every deployment group is a great idea, so our mobility sources of Deintalos (he opens Shambling Horde around him), Dire Wolf (that can move up to 24″ per turn for a cost of double) and Crypt Ghast with his movement buffing triple will all go to separate deployment groups.
With 13 bodies I must have one group with 5 fighters and 2 groups with 4. Looking at deployment maps I think the most numbers are needed in 2 last ones and in both Hammer is in position to reach the biggest numbers of them and it also requires movement buff to do so. When thinking this way the list basically writes itself – the Hammer will be a 5 body unit with Crypt Ghast. As I mentioned way earlier I think Shield should be the weakest group, so naturally Dire Wolf and 3 other fighters will be there. This leaves us with Deintalos and 3 other fighters in Dagger. The description above is a very simplified version of what actually happened (I was checking every configuration for the purpose of looting treasures in first round and possibility to score points in first round in Proving Grounds). The last thing is deciding where to put Skeleton Warriors. I wanted to put them in the most numerous group and in the least important group and in the end the list looks like this:
Dagger:
Deintalos
3x Grave Guard with Great Wight Blade
Shield:
Dire Wolf
2x Grave Guard with Great Wight Blade
Skeleton Warrior with Spear
Hammer:
Crypt Ghast
3x Grave Guard with Great Wight Blade
Skeleton Warrior with Spear
If you are reading this within first few hours of publication then probably I’m still playing the tournament this text is about, I hope people will like the battlepack and the tournament will be a success. Of course preparation is only one of the factors required for winning tournament, but I like to start tournament games with a feeling that my list has an advantage when it comes to victory conditions, it releases a lot of pressure and makes planning your rounds way easier. I hope dice gods will look elsewhere as I don’t like when critical fights are decided by a streak of critical hits (it sucks for both players).
Last moment edit: Sadly life get in a way for some players and few guys didn’t make it and we ended up with smaller number of players than the expected 12. If you are interesting in final results then I will put some tournament summary on #tournament-talk channel on Discord. As always thanks for sticking to the end and I hope you had a good time reading this.
Lately I was asked for help with Paladins list and I think the lists that came from few conversations look great so I hope someone will get inspired by them or simply use them to some success.
Big Gun Paladins
I was asked for tweaking existing list with additional power projection so slow Paladins don’t have to move to every problem that has to be solved. Fortunately new CoS allies in form of Battle Priests freed some points and made this beautiful lists possible:
If Divine Blessings are used in your area you can consider downgrading Protector to Retributor to add +1 Crit DMG on Judicator.
If you want to have the cake (4 Paladins with Starsoul Mace) and eat it too (invest in a strong ranged unit) you can change both Judicator and Protector to Paladins with Starsoul Mace and instead of Retributor Prime you can pick Judicator-Prime with Boltstorm Crossbow and even add Might (+1 Strength) blessing on him
Using similar Template there are multiple variants that can easily be created. The recipe is simple:
Retributor-Prime (180pts, Hero)
Battle Priest (65pts, Hero)
Battle Priest (65pts, Hero)
Paladin with Starsoul Mace (155pts)
Paladin with Starsoul Mace (155pts)
Paladin with Starsoul Mace (155pts)
Paladin with Starsoul Mace (155pts)/Protector (140)/Retributor (130pts)
70-95 points to upgrade one of the Paladins or a leader to a Prosecutor/Judicator. You can even take 2 of them if cheaper ones will work for you
I really liked the list above and decided to go one step further and transform Paladins to even more “shooty” warband.
Thunder-Lizard Paladins
This composition lets you have one Paladin and one shooting unit in every deployment group. It could be done before with Xepic instead of Battle Priest so I’m curious if someone tried it. If you did please let me know how it worked out for you.
I really like both lists and despite the fact I didn’t show a Prosecutor variant I think using one of the fliers instead of Judicator can also be a great decision thanks to better usage of Furious Avengers
As always thanks for reading and I hope you have a great day.