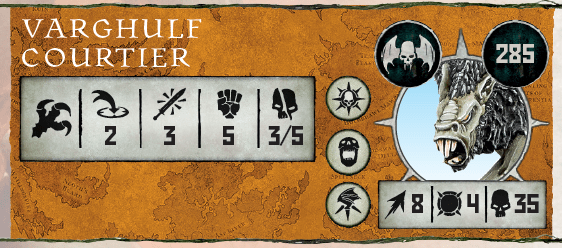
Big Hammer – Varghulf Courtier is the most expensive hero in the whole grand alliance for a reason, with Terrifying Frenzy he can deliver 6 attacks with Strength 5 and 3/5 damage to anything in 10″ radius. Most wild dice will be spend on either gaining the triple for this ability or “upgrading” it to Rampage for your Varghulf Courtier.
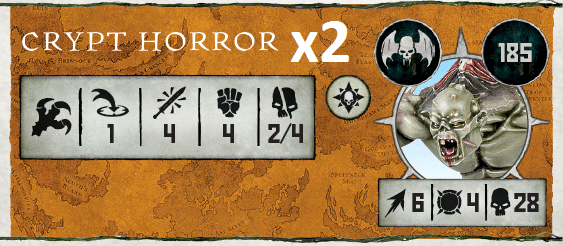
Smaller Hammers – FEC have quite unique ability to add up to 4 attacks on already strong fighter for as cheap as a double with Chosen of the King.
This ability requires the Abhorrant Ghoul King to be close to your Horror, so consider splitting them very carefully. Most probably all of this list doubles will be spent on this ability
Mobility – In case you need to crank already impressive mobility of this warband even more, you can do this with Bringer of Death. Both of your heroes have access to this ability, but Varghulf Courtier may be more effective with the other triple already mentioned above.
Winner of 16 player Tournament in Wrocław (Poland) in January 2023
Dagger:
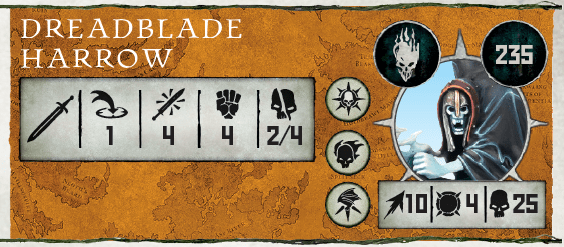
Dreadblade Harrow
Grave Guard with Great Wight Blade
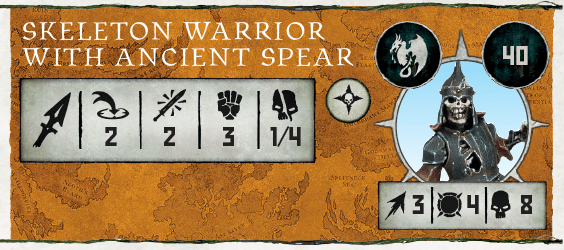
Skeleton Warrior with Ancient Spear
Shield:
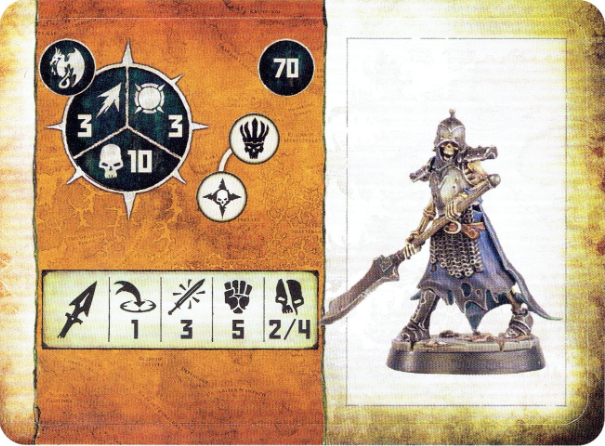
Deintalos the Exile
2x Grave Guard with Great Wight Blade
Hammer:
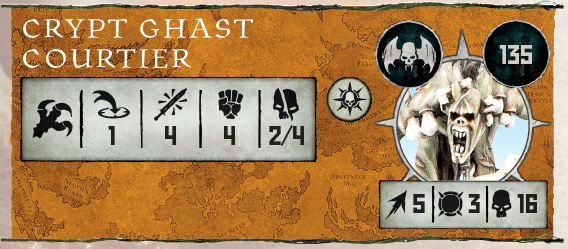
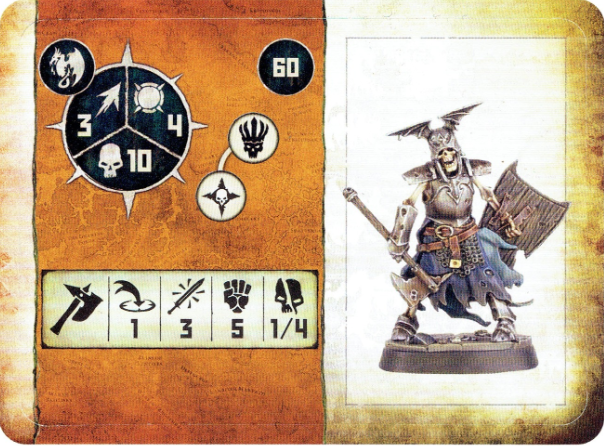
Crypt Ghast Courtier
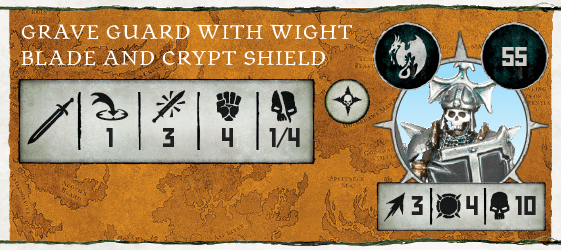
Grave Guard with Wight Blade and Crypt Shield
2x Grave Guard with Great Wight Blade
Tips, Tricks & Tactics
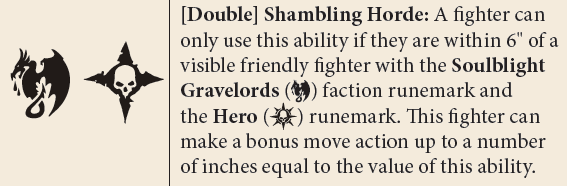
Surprising Mobility – Thanks to Shambling Horde ability that most of the list has access to and Bringer of Death from FEC ally the warband can suddenly reposition with surprising speed.
Both abilities combined makes most of the map reachable for the dead horde in case the pilot of the list decides to spend ability dice on mobility.
Teleporting Treasure – After picking up tyreasure in any treasure mission you can end up in any place of the map with the help of Phantasmal Discorporation.
Even if you have to chase your opponent treasures, ability to teleport on 10″ move flyer will let you attack any fighter on the battlefield.
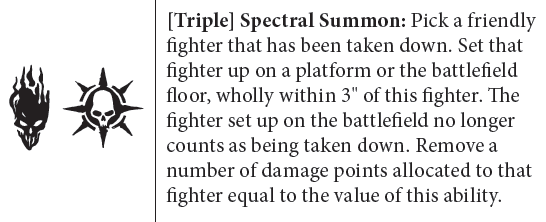
Resurrection – After the resurrection nerfs (only Skeleton Wartrior can be resurrected to full health with Summon Undead Minions) Spectral Summons became way better ability as it allows you to resurrect any fighter from your warband and not only Minions like with Soulblight ability. It is also a backup plan if your leader would be killed as one of your resurrectors can resurrect another.
Quads – Usually Soulblight Gravelords hordes aren’t too happy when rolling quads as they want to use all od their ability dice on resurrection and mobility, the other problem is lack of fighter that could win the game on the spot with rampage. Deintalos in the list grant access to Vanhel’s Danse Macabre that can make the impact similar to using Rampage on scariest fighters in the game (at least with higher ability value).
Nighthaunt weakness – The problem with Nighthaunt fighters is that they are not very durable, lack damage and are expensive thanks to new cost adjusting algorithm in second edition. The sad reality is that filling Nighthaunt list with as many non-Nighthaunt fighters as possible is the “sad but correct” solution and this is partially the approach that this list takes. All the points above are true only for very competitive environments.
Nighthaunt Strengths – The faction has access to (arguably) the most powerful resurrection ability in the game – Spectral Summon
It’s strength lies in the possibility to return to battlefield any model that isn’t too big to fit wholly within 3″ circle around Nighthaunt hero. The other valuable aspect of the faction is that its fighters are very mobile, so no objective/treasure on the map is outside of their reach.
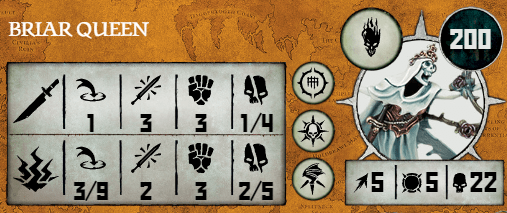
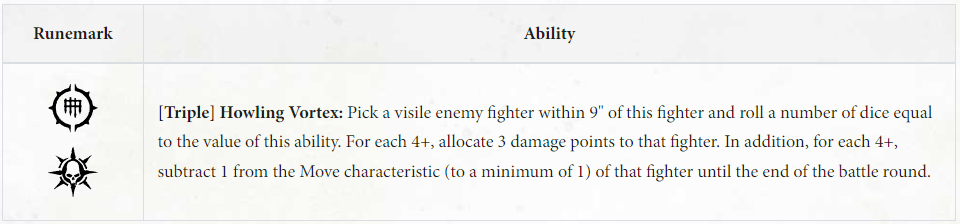
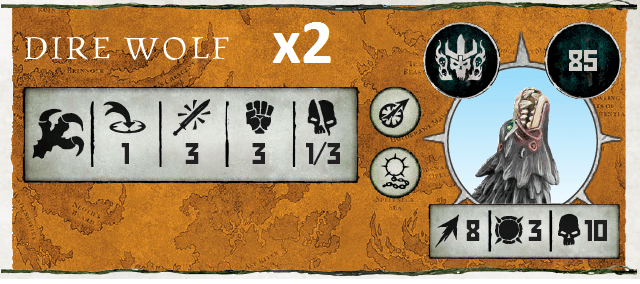
Howling Vortex – The bread and butter of this list. This single ability is a perfect answer for meta dominated by Brewgits (paired with 3″/4″ move titans), because setting up their combo gives you one turn to react before the supercharged enemy titan can act and this is a perfect moment to use Howling Vortex non only to damage your opponent biggest threat, but also to partially “net” it by greatly reducing its movement speed. Keep in mind that slowing your opponent titan that most likely will want to prioritize your Briar Queen make preventing it from happening with Necromantic Bonds (Dire Wolf reaction) way easier.
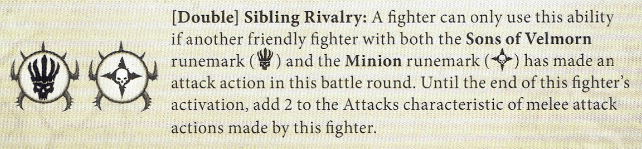
General plan – The main thing this list wants to do is keep the numbers up, keep your Briar Queen safe (try to use as much of her 9″ range as possible) and every turn you have access to high triple use Vortex or resurrect one of your fighters with either Briar Queen or King Morlak Velmorn (his sons are raised by him with full health). If you will have any spare doubles then your allied Grave Guards could be supercharged with Shambling Horde or Sibling Rivalry
Supremacy: Usually it’s recommended to activate Dire Wolfs last but as there are 4 positions (if terrain isn’t blocking them) on the map where oval bases can stand on 2 objectives at once make sure your opponent isn’t body blocking this positions and if he starts moving his fighters into such positions it may be a good idea to activate your wolfs early to secure this positions to get an early lead in VP. If your opponent isn’t experienced enough and won’t block areas between objectives then ideal turn will look similar to waiting early with your slower guys, moving them to both closer objectives and in last 2 activations placing your wolfs directly between furthest and middle objective on both sides of the board. If you don’t expect your opponent to block this positions and he already moved someone to one of his closest objectives you can risk waiting with the wolf to then use double for bonus move(enemy positioning can screw this plan). This setup will give you 1 fighter on each objective which should grant you early advantage. Of course secondary objective or opponent warband can change this plan, but its a solid base.
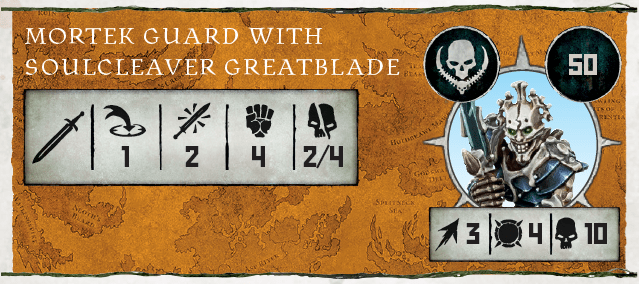
Ability usage: Outside of situations when you will use ability dice on inspiring presence, Dire Wolf/Hekatos movement ability or +1 Toughness for Mortek (very strong versus bigger groups of Grave Guards or when you need to deny scoring secondary objective like early grave or predator and prey) all of your dice will be spent as a force multiplayer of your Stalkers. Usually you want access to 2 doubles to supercharge both of your stalkers with one of the 2 doubles they can use:
If your stalker is already in combat (ideally with 2 chaff models/1 elite) you want to activate him early and in most cases use double for extra point of damage on hits and crits, if your stalker isn’t in combat then you will most likely want to use the second ability to move him into combat with a bonus move. As OBR strongest abilities are doubles you shouldn’t worry about storing your Wild Dice(outside Tides of Battles where Wild Dice should be used to fight over Primary Objectives) and in most cases it’s a good idea to starting round two spend all of your wild dice on improving triples to quads (rampage on stalkers is devastating), fighting for initiative if needed and making additional doubles.
general gameplan in later turns: after initiative decide if you want to activate your stalkers first (to potentially kill fighters that could escape/harm them later) or to leave their activations for later. Another great idea for early activation is “hugging” (moving into 1” range of) big threat that could mess up your stalkers with mortek guard. In the middle of the turn you want to burn activations on moving to objectives, attacking with your mortek with greatblade, running away from danger with dire wolf and waiting with mortek that are already in good positions. Near the end of turn (ideally you already out-activated your opponent) you want to start capitalizing on mobility of your dire wolfs and stalkers (it isn’t uncommon to still have all ability dice unused until now) to win objectives by moving there with wolves or killing chaff with stalkers. It may be better idea to disengage, move and then use double for bonus move with your stalker o reach some distant objective than to simply attack twice if it will grant you some points at the end. OBR is very good at playing objectives rather than playing for board position as due to low Strength on Stalkers and high Toughness of your chaff there is usually less deaths and damage is less predictable for both sides.
Dire Wolf trap: if you need to intercept moving enemy fighter (as he is running away with treasure, moving to kill your leader, its a big fighter moving into position to rampage or any other situation you need to stop someone) always keep in mind how far from your leader his movement ends (you may need to ask your opponent to do move actions one by one) as even if your leader no longer has any actions if enemy fighter finish a move action 3” from your leader you can react with Dire Wolf and instantly move your Dire Wolf into engage. It can save your leader, mess up opponent plan for rampage or prevent someone from reaching objective. It may not be the flashiest of moves but it already helped me win a lot of games so it’s great to always keep this option in mind when someone is moving near your hero.